Category Archives: SharePoint

Using Select2 and SharePoint 2013 REST API with large lists and infinite scroll

Recently during a project I was involved with creating a custom application with JavaScript inside SharePoint. One of the requirements was to load data from a large list (> 5000 items) into a Select2 dropdown control. Select2 is a very handy dropdown control to use in custom applications. It features out of the box search functionality, infinite scroll and many more nice features. However I struggled a few days with some specific problems in combination with SharePoint. In this article I’ll describe how to use Select2 in combination with the SharePoint REST API and large lists.

Select2 uses out of the box a HTML select or input control to bind itself to. Because we need to specify a custom ajax function, Select2 will only work in combination with an input control which is hidden. Add to your page an input type hidden control, like this:

<input id="selectData" type="hidden" />

We need to fulfill a few requirements which are important:
– Able to select from a very large list
– Support searching on title
– Fast
– Reliable

To meet these requirements we need to overcome a few challenges. The first challenge is large list support. To overcome this issue, you need at least indexed columns in case you want to query on specific columns. Be aware that you need to set the indexes before filling the list with data! Second challenge is how to use Select2 with the SharePoint REST API. Documentation on the internet is very rare on this specific subject and also there are a few problems with OData and SharePoint 2013 which you’ll face. In the following sample I will show how to bind Select2 and make it possible to search and use infinite scroll. It works also very fast and reliable. The sample uses a list named Books and uses the Title field to filter on.

var webAbsoluteUrl = _spPageContextInfo.webAbsoluteUrl;

$('#selectData').select2({
    placeholder: 'Select a book title',
    id: function (data) { return data.Title; },
    ajax: {
        url: webAbsoluteUrl + "/_api/web/lists/GetByTitle('Books')/items",
        dataType: "json",
        data: function (term, page, context) {
            var query = "";
            if (term) {
                query = "substringof('" + term + "', Title)";
            }
            if (!context) {
                context = "";
            }
            return {
                "$filter": query,
                 "$top": 100,
                 "$skiptoken": "Paged=TRUE&amp;p_ID=" + context
            };
        },
        results: function (data, page) {
            var context = "";
            var more = false;
            if (data.d.__next) {
                context = getURLParam("p_ID", data.d.__next);
                more = true;
            }
            return { results: data.d.results, more: more, context: context };
        },
        params: {
            contentType: "application/json;odata=verbose",
            headers: {
                "accept": "application/json;odata=verbose"
            }
        }
    },
    formatResult: function (item) {
        return item.Title;
    },
    formatSelection: function (item) {
        return item.Title;
    },
    width: '100%'
});

// Function to get parameter from url
function getURLParam(name, url) {
    // get query string part of url into its own variable
    url = decodeURIComponent(url);
    var query_string = url.split("?");

    // make array of all name/value pairs in query string
    var params = query_string[1].split("&");

    // loop through the parameters
    var i = 0;
    while (i < params.length) {
        // compare param name against arg passed in
        var param_item = params[i].split("=");
        if (param_item[0] == name) {
            // if they match, return the value
            return param_item[1];
        }
        i++;
    }
    return "";
}

First thing we do is getting the current web URL. This is needed to construct the path to the REST API. Then we bind the Select2 control using JQuery. We define first a placeholder. This is the text that will be shown when nothing is selected. We also specify a function to determine the id. Select2 standard can’t handle the data format which comes back from SharePoint, so we need to set manually that the identifier is the Title field of the book. The same applies for the formatResult and formatSelection which makes sure that the title is shown as field in the dropdow list. The most important part is the ajax parameter. First a URL to the REST API is specified, then we specify dataType JSON, because we want all the data as JSON and not XML. We also need to set this explicitly in the contentType and headers of the HTTP calls we need to make. In the data parameter we specify the logic to handle the queries and make sure that the skiptoken is specified. Because of a bug/designed feature in the SharePoint REST API, the skip parameter doesn’t work. The linked article describes an alternative by using the skiptoken. We store this skiptoken partially in the context variable to make sure Select2 tracks it for each next call. The next important part is the results function. This function parses the result and grabs the p_ID value to store in the context variable. In case the __next value is set, we know that more data is available, so then we also set the more variable to true. Select2 uses the more variable to indicate if a next page with more items is available for infinite scroll.
How to gather data from SharePoint using REST API on external website

Recently I was struggling to gather in an external web application data from SharePoint. I was not able to use the App Model as the customer didn’t have the proper App Infrastructure in place. In my example I wanted to call from an external web application the SharePoint REST API to gather search results. This is possible when using a service account, but I didn’t want that approach, because I wanted security trimmed search results. Passing through credentials is impossible as the environment was using NTLM authentication and then you’ll face the Double Hop problem. Activating Kerberos would solve this issue, because that features delegation, but was also not feasible as you need to modify the farm configuration which was not allowed. Next idea was to do it Client Side!

Client Side means in our case using Javascript. The browser should perform the request to SharePoint and then process the results to display it in an external web application. The advantage is that the end users credentials are used to authenticate against SharePoint and that security trimmed results are retrieved. Starting with this ideas I immediately struggled with browser security restrictions. The web application is running on a different domain then SharePoint and then you’ll face cross-domain issues. There are a few approaches to solve this:
– CORS (Cross-origin resource sharing)
– JSONP (JSON with padding)
– IFrame with PostMessage API

CORS is quite easy to implement in combination with JQuery. However it is not usable with SharePoint, because you need to change the server configuration. CORS works only when the server sends modified HTTP Access-Control-Allow-Origin headers. This requires server modifications and is therefore not a solution in our case.

JSONP is an alternative for doing web service requests. Instead of doing a normal JSON request you load the webservice request as a script with a callback method which gets the data as argument. This technology is however not usable in combination with SharePoint. SharePoint sends with all responses a HTTP header X-Content-Type-Options: nosniff. Because of browser security improvements an additional check is performed by the browser to see if the MIME-type is correct. SharePoint doesn’t send the MIME-type which is allowed in script tages so the browser will block the script. There is an article on MSDN about this security measures in Internet Explorer. Conclusion is that this technique is also not usable in our case.

Another option is to use IFrames with PostMessage. PostMessage is an API introduced as part of HTML5. Most browsers support this (IE since IE8). The idea is to use an IFrame in the web application and open a SharePoint page in the IFrame. The SharePoint page contains some Javascript to call the REST API and then sends back the results using PostMessage. When using IFrames you’ll need to tackle two problems. First thing is that you need to make sure that both the web application and SharePoint is using HTTP or HTTPS. When combining them this will give security warnings in the browser. Another problem is that SharePoint sends a HTTP header standard which blocks it from using SharePoint content in IFrames. Luckily there is a solution for this. You need to include the following control on your aspx page to allow frames:

<% Register Tagprefix="WebPartPages" Namespace="Microsoft.SharePoint.WebPartPages" Assembly="Microsoft.SharePoint, Version=15.0.0.0, Culture=neutral, PublicKeyToken=71e9bce111e9429c" %>
<WebPartPages:AllowFraming runat="server"/>

This control when added to the page will remove the X-FRAME-OPTIONS HTTP header which prevents displaying SharePoint content in a IFrame/Frame. Be aware that this only works on ASPX pages! Otherwise you’ll still need server modifications by configuring IIS. The ASPX page can for example be uploaded to the style library of a Site Collection. This library has normally read permissions for All Authenticated users which is typically useful for scenario’s like this.

In the following sample I will show some code samples to make it possible to send information cross-domain using the SharePoint REST API. First step is create a web application outside SharePoint or just an HTML page with some Javascript. Add an IFrame to it with the URL to the helper page we will create later on and add the JQuery script library. Then use the following code to make sure that we can receive messages from the helper page in SharePoint:

$(document).ready(function () {
  if (typeof window.addEventListener !== "undefined") {
      window.addEventListener("message", receiveMessage, false);
  } else if (typeof window.attachEvent !== "undefined") {
      window.attachEvent("onmessage", receiveMessage);
   }
});

function receiveMessage(event) {
    var eventData;
    try {
       eventData = JSON.parse(event.data);
        // Implement your logic here!
    } catch (error) {
        // Implement some error handling here!
    }
}

In the above sample we are using JQuery to wait before the page is loaded. Then we add a eventreceiver to the window object to receive messages using the PostMessage API. In case a message is received a method called ReceiveMessage is called. There we need to parse the JSON message to an Javascript object and then we can implement our logic.

Now we have the application page in place we need to create the helper page which needs to be uploaded to SharePoint. Create a new aspx page (you can change a standard publishing page in SharePoint), add the AllowFramingControl to it and add a script reference to a Javascript file we will upload as well. In the new Javascript file we need to add the following code:

var origin = "http://urltowebapplication.com" // Make sure that origin matches the url of you web application with iframe!!!!

// Start executing rest call when ready
$(document).ready(function() {
  callRestAPI();
});

function callRestAPI() {
    // Construct rest api call
    var restUrl = _spPageContextInfo.webAbsoluteUrl + "/_api/web";
    $.ajax(
    {
       url: restUrl,
        method: "GET",
        headers:
        {
           "accept": "application/json;odata=verbose",
        },
       success: onSuccess,
       error: onError
    });
}

function onSuccess(data) {
    if(data)
    {
        var response =
        {
            header: "response",
            message: data
        };
        parent.postMessage(JSON.stringify(response ), origin);
    }
}

function onError(err) {
   var response =
   {
       header: "error",
       message: err
   };
   parent.postMessage(JSON.stringify(response), origin);
}

The above code sample again uses JQuery to wait before the page is loaded. Then it constructs a url to call the SharePoint REST API to retrieve details about the Web object. You can extend this by passing parameters by querystring, etc to make it more dynamic. After that it calls the REST API using an Ajax call. It uses some headers to make sure that JSON is returned instead of XML. Then the postmessage call is used to send the message to the parent in JSON format when the call was succesfull or not. On the other side the response can be checked to see what kind of data has been send by checking the header. This concept can be extended with things like two way communication using Postmessage. The disadvantage of all of this is that everything runs in the browser and that automatic logon in the browser needs to be supported. Otherwise instead of the helper page an access denied page will be loaded, resulting in no messages being send. You can’t detect this properly from code because access to the DOM in IFrames is blocked in case of cross-domain content. The only thing you can do is implement some timeout mechanism and send always a lifesign signal using Postmessage that the page has been loaded to let the other page know that everything is ok.

Installing SharePoint 2013 Apps programmatically: what’s possible, what not?

Last week I was looking for a solution to install SharePoint Apps using Server Side Object Model (SSOM) or Client Side Object Model (CSOM). Microsoft does not really support this scenario as it is not the preferred ways to use Apps. Normally end users should install Apps themselves on sites they want. In this post I will cover the possibilities of provisioning Apps using code. But I investigated the API to see if there is a way to support the sample scenario somehow.

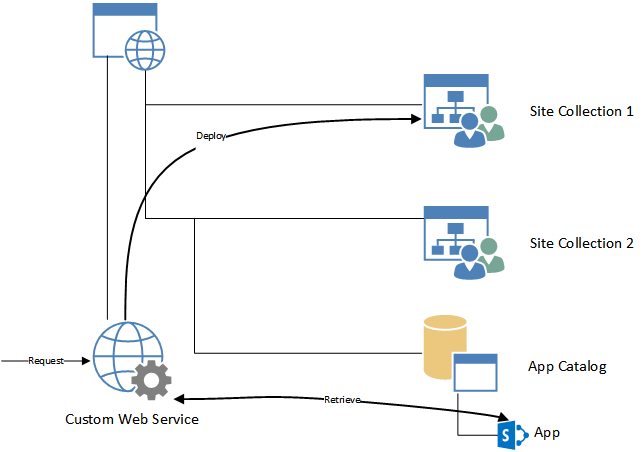
Scenario: I want a Web Service which enables me to provision Apps from the App Catalog Site Collection on request to a Web on a specific Site Collection. The Web Service should be a Full Trust Code solution which grabs the App in the App Catalog and provisions it. The App Catalog should be used to make it easy to deploy new Apps from a central place and to support versioning in an easy way:
Deploying Apps

Now we know what we want we can look into the API which is present in SharePoint and see what possibilities we have. Microsoft offers not much API’s for provisioning Apps. When browsing on the internet you will probably find a method called LoadAndInstallApp on the SPWeb object. This method however only accepts stream object to a binary representation of the .app file. The .app file is actually a zip file containing the application. The disadvantage of this solution is that you have to upload the App to every single Web where you want to deploy this App and not using the advantage of a central location like the App Catalog to distribute the Apps and taking care of versioning. A sample of how to install apps using SSOM can be found on MSDN Blogs.

When digging further in the SharePoint DLL’s using ILSpy you will notice that there is no publicly available API to install Apps directly from the App Catalog. Internally there are some methods available, as it is possible from UI to add an app from a Corporate Catalog on a Web. A possible workaround is to retrieve the App file from the App Catalog (it is internally just a list) and then forward the stream object to the LoadAndInstallApp method. This works however SharePoint doesn’t notice then that the App is coming from the Corporate Catalog. In case a new version of the App is installed on the App Catalog, SharePoint doesn’t know that the App which is installed on that specific Web is updated and can’t notify the site owner by a notification that an update is available (SharePoint won’t push new versions automatically!). Another thing which you’ll notice is that when opening the Site Contents page and open the context menu on the installed App that the About option is missing. This page is very important, as this page normally allows an end-user to update the App and see if an update is available. So this means that the end-user can’t update the App properly from UI. Conclusion:The API is not that mature to use it in a professional environment to support scenario’s like this. We need to hope that Microsoft will come with an API to support scenario’s like this in future. Currently it seems not to be possible to programmatically install an App from the App Catalog into a Web.

I also want to mention the CSOM variant of the LoadAndInstallApp method. It is present in both the .NET Managed CSOM and Javascript library. However when you call it, you will get an error that it is only supported when sideloading is enabled. Sideloading should only be used in development environments. Therefore CSOM doesn’t provide a way to deploy Apps programmatically in SharePoint on production environments. There reason is probably to reduce the risk to install corrupt Apps or Apps which can delete or malform existing data in the Web.

SharePoint Search & Migration Part 4: Search Result Types and Display Templates

In a few series of posts I will discuss changes in SharePoint Search which might affect you when migrating from SharePoint 2010 to 2013. Search is one of the most changed components in SharePoint 2013 and therefore I split the posts up in four parts covering some subjects you need to know before migrating to SharePoint 2013. All parts will be available with the links below when the posts are available:

Part 1: Search Settings
Part 2: Search Web Parts
Part 3: Search Results Sources
Part 4: Search Result Types and Display Templates

In this post I’ll discuss Search Result Types and Display Templates. Both are new features coming with the new Search platform in SharePoint 2013. You’ll need them in case you want to customize the way how search results are displayed. In the past XSLT was the way to go by changing the search results page and change the Web Part settings XSLT. In 2013 this functionality is no longer available and Results Types and Display Templates are the way to go.

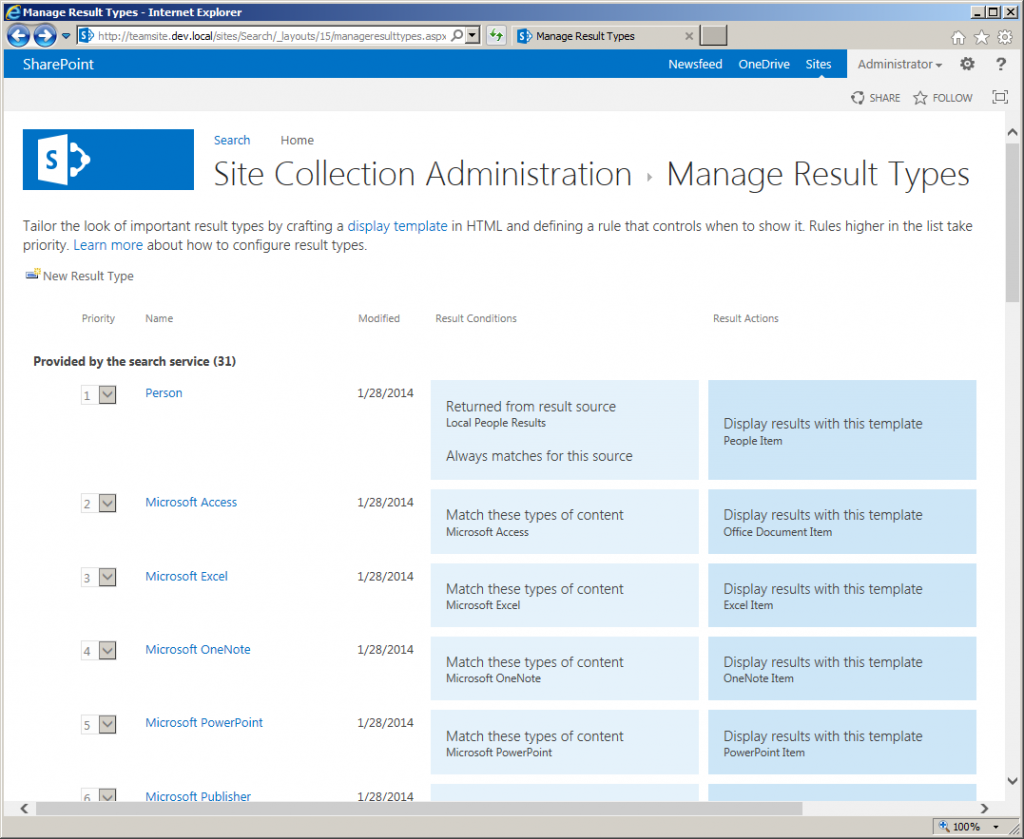
Let’s focus first on Result Types. Microsoft provides on MSDN a nice article which gives you a basic understanding of what it is. In short: when searching you’ll get results back of different types. A site is different from a library, a word document is different from an excel document or image, etc. Each type of result is defined as a Result Type. Out of the box a set of result types is predefined like all types of Office documents, pages, sites, libraries, etc. Per type a Display Template is coupled which determines how the result of the specific type should be rendered in the Search Results Web Part. Result types are managed per Site Collection and Web. In the Site Settings menu you can select Search Result Types for managing them on Site Collection level and Result Types to manage them on Web level. After opening the page you’ll see a screen with all result types on the site collection or web:

Manage Result Types

Manage Result Types page for Site Collection Administrator

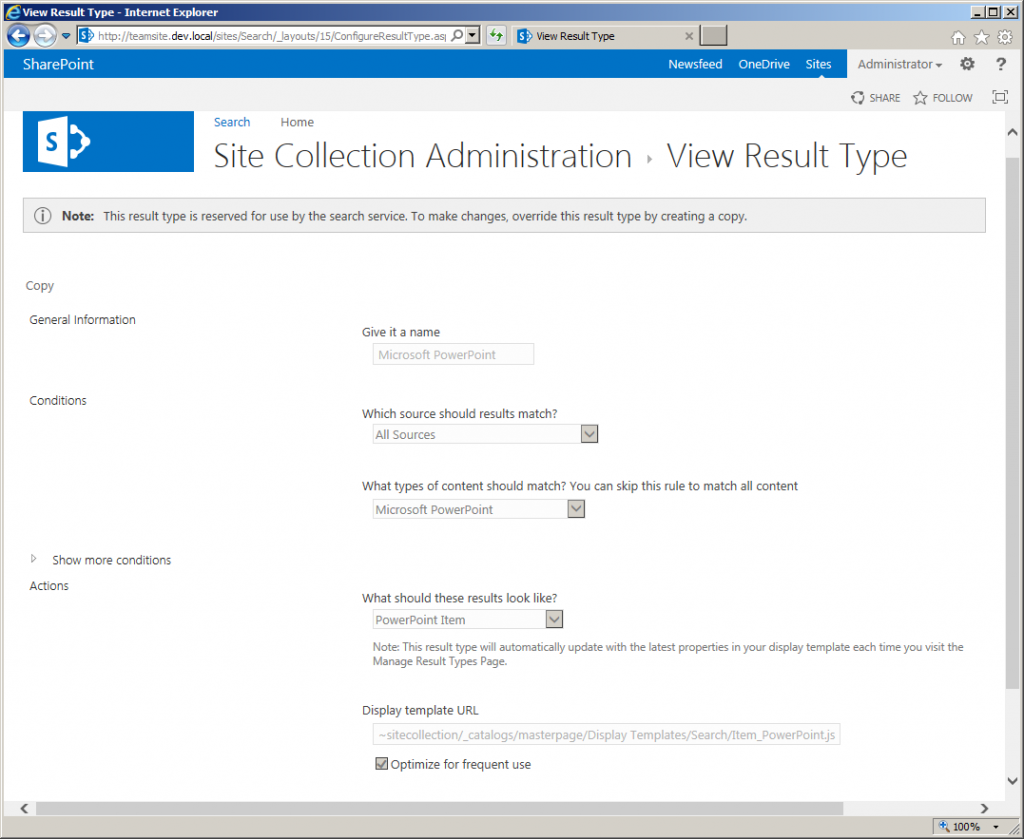
All out of the box delivered Result Types are read-only. This is similar as with Result Sources, where the out of the box settings are also read-only. When we open one of the Result Types we can see how it’s configured and what you can configure:

View Result Type page

View Result Type page

For each Result Type you can specify the name and conditions. The conditions filter first on Result Sources. You can also select the option to use all if you don’t want to filter on it. Next you can filter on the type of results. This is a predefined set of types which SharePoint recognizes. When you expand “Show more conditions” you have the ability to create filters based on Managed Property values. In case you have added additional fields to specific content types and you want to filter on them you can use this functionality to add a filter. The last option you need to select a Display Template. This list is created based on the approved Display Templates in the Master Page Gallery (in the subfolder Display Templates). This is actually the template that is used to render the Search Result which is matching this Result Type. When created it will appear in the top section of available Result Types.

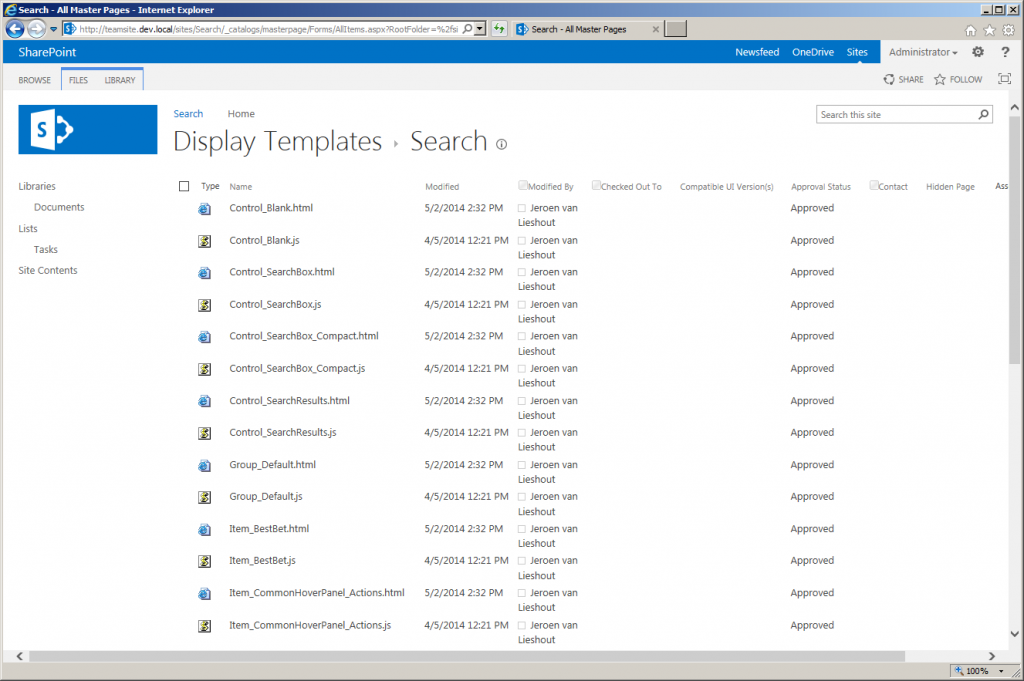
Now we have discussed the Result Types we can focus on Display Templates. Display Templates are the replacement for XSLT and provide a powerful way to create templates within SharePoint. Microsoft has again a good article about what a Display Template is. Display Templates are stored inside the Master Page Gallery in a subfolder called Display Templates. Inside that folder there a some subfolders for specific categories of Display Templates. In our case we need to open the Search folder and that should look like the screenshot below:

Search Display Templates

List of Search Display Templates in the Master Page Gallery.

In case the Publishing Infrastructure feature is not activated on the Site Collection, you’ll only see .js files. Be aware of this! In that case if you don’t want to activate it and want to create or change display templates, read this article  from Martin Dreyer where he describes how to change display templates on non-publishing websites. On publishing websites you should ignore the .js files. They are automatically updated by SharePoint when you make changes to the HTML files. The MSDN article which I’ve shared already describes how you can change Display Templates. You can adjust them to display for example additional Managed Properties or change the styling. On the internet you can find a bunch of examples to built-in pretty cool stuff with display templates. A small selection is stated below:

Add twitter links using Display Templates
Image Slider
Customize Display Templates and deploy them using a solution

Setting up SharePoint 2013 devbox for provider hosted apps

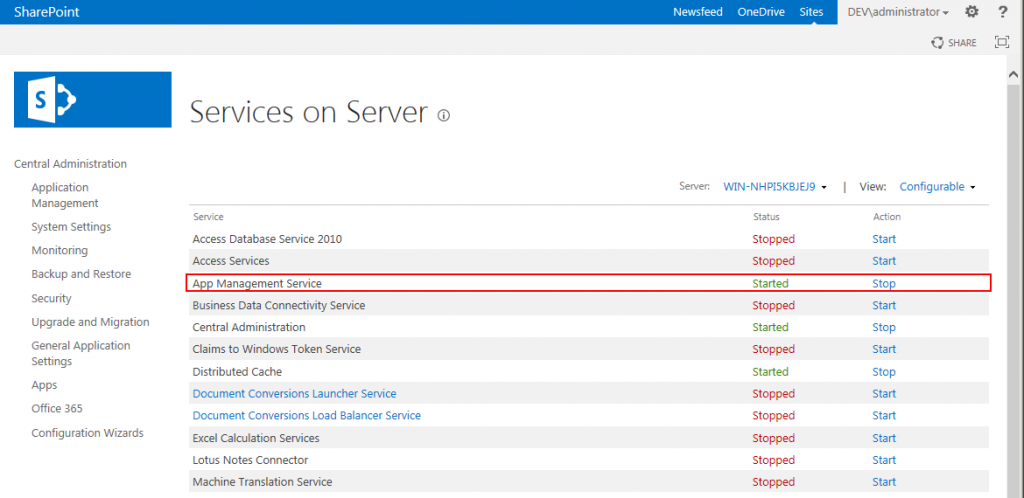
For preparing another article I was trying on my pretty straight forward dev box to debug an empty provider hosted app solution. However I was experiencing some problems with setting up my dev box to allow provider hosted apps to run on the same box using IIS Express. First I started with a blank new SharePoint 2013 App solution in Visual Studio 2012 and tried to deploy it on my machine (using a IISExpress instance for running the actual contents of the app). First deployment was failing because the services needed to run apps where not running. Make sure that the appropiate services are running as shown in the following screenshots:

AppManagementService

The App Management Service Application should be started.

AppManagementService2

The App Management Service should also be started.

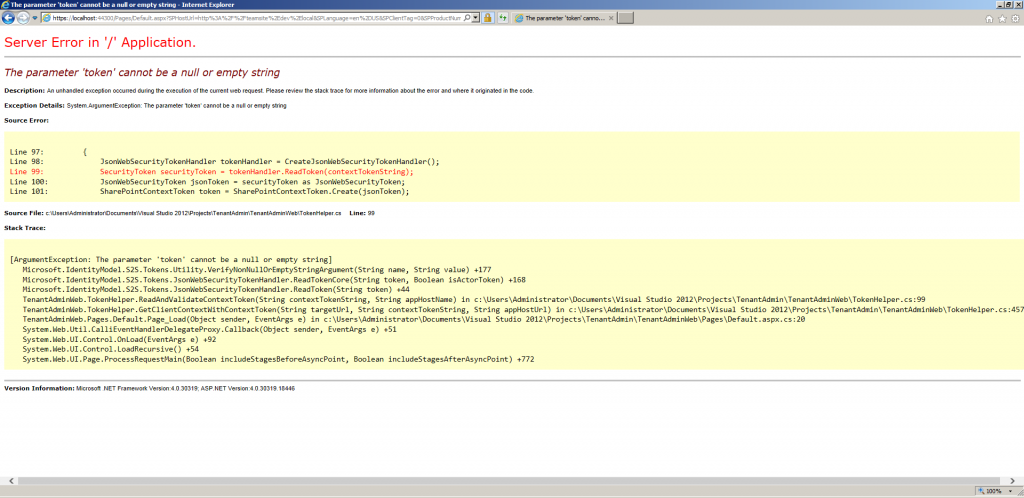
After starting the services and performing an IISReset I could successfully deploy the app to SharePoint. A window will open with the question to trust the app. After that I was getting the following exception:

TokenError

A token error which was occurring…

After googling a bit around on this error I found an >article which explains why it isn’t working. The app is trying to authenticate using the so-called Low-Trust model and expects Access Control Service (ACS) as a trust broker. I decided that I want to use High-Trust because I don’t want to rely on an internet connection in the dev box to connect to O365 ACS. The advantage is that you don’t need Office 365 for ACS, the disadvantage is the bunch of configuration work to do. First you need to do some preparation work which is described by Microsoft in the following article. Probably you already have a farm installed, so you can start at step 6. To make it easier I included the full PowerShell script from the article here with some useful comments:

#Start SharePoint Services
net start spadminv4
net start sptimerv4

#Set App Domain, change name if you want to
Set-SPAppDomain "App-Domain"

#Verify services are started
Get-SPServiceInstance | where{$_.GetType().Name -eq "AppManagementServiceInstance" -or $_.GetType().Name -eq "SPSubscriptionSettingsServiceInstance"} | Start-SPServiceInstance
Get-SPServiceInstance | where{$_.GetType().Name -eq "AppManagementServiceInstance" -or $_.GetType().Name -eq "SPSubscriptionSettingsServiceInstance"}

#Create new managed account, remove this line if you already have one!
$account = New-SPManagedAccount

#Create services for app domain, please change domainname\username to correct user
$account = Get-SPManagedAccount "domain\user" 
$appPoolSubSvc = New-SPServiceApplicationPool -Name SettingsServiceAppPool -Account $account
$appPoolAppSvc = New-SPServiceApplicationPool -Name AppServiceAppPool -Account $account
$appSubSvc = New-SPSubscriptionSettingsServiceApplication –ApplicationPool $appPoolSubSvc –Name SettingsServiceApp –DatabaseName SettingsServiceDB 
$proxySubSvc = New-SPSubscriptionSettingsServiceApplicationProxy –ServiceApplication $appSubSvc
$appAppSvc = New-SPAppManagementServiceApplication -ApplicationPool $appPoolAppSvc -Name AppServiceApp -DatabaseName AppServiceDB
$proxyAppSvc = New-SPAppManagementServiceApplicationProxy -ServiceApplication $appAppSvc

#Change tenant name if you want to
Set-SPAppSiteSubscriptionName -Name "app" -Confirm:$false

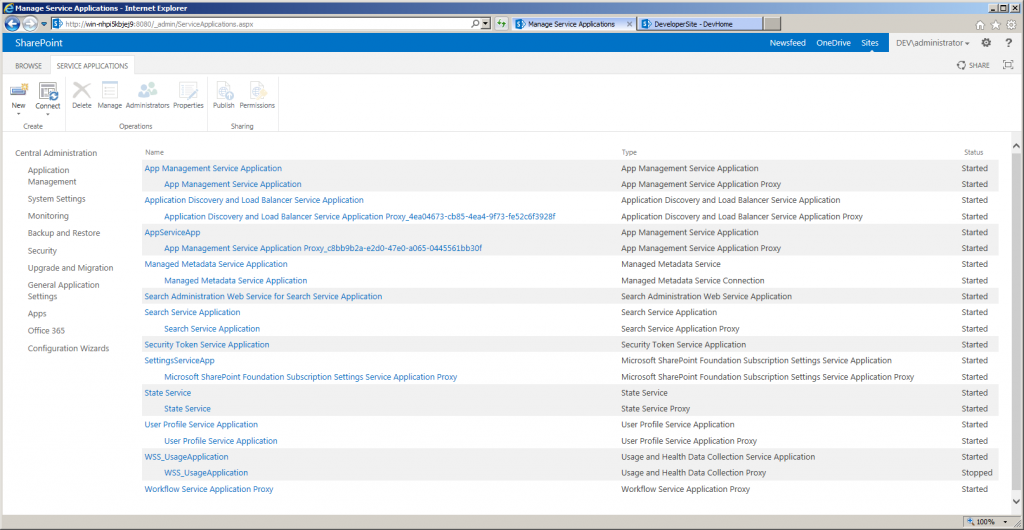
After executing the script you’ll see new service applications popping up in Central Administration:

NewServiceApplicationsAppManagement

New service applications and proxys has been added by the script.

Then you can start with the preparations to create your High-Trust Provider Hosted app. Microsoft described this again in a article. Again I’m sharing the PowerShell which is posted along the article:

#Path to exported certificate, change if needed
$publicCertPath = "C:\Certs\HighTrustSampleCert.cer"

#Read certificate and create trustrootauthority
$certificate = New-Object System.Security.Cryptography.X509Certificates.X509Certificate2($publicCertPath)
New-SPTrustedRootAuthority -Name "HighTrustSampleCert" -Certificate $certificate

#Create Trusted Security Token Issuer 
$realm = Get-SPAuthenticationRealm
$specificIssuerId = "11111111-1111-1111-1111-111111111111"
$fullIssuerIdentifier = $specificIssuerId + '@' + $realm
New-SPTrustedSecurityTokenIssuer -Name "High Trust Sample Cert" -Certificate $certificate -RegisteredIssuerName $fullIssuerIdentifier –IsTrustBroker
iisreset 

#Configure to use without HTTPS, don't use this on NON-DEV boxes!!!
$serviceConfig = Get-SPSecurityTokenServiceConfig
$serviceConfig.AllowOAuthOverHttp = $true
$serviceConfig.Update()

The article also describes what to do when creating the solution in Visual Studio. You need a .pfx export of your certificate with private key to let it work. When running the default sample you should see at the end a page with the Site Title displayed on it:
App

Now you can start creating your app! Happy coding!

SharePoint 2013 Lazy loading Javascript

In SharePoint 2013 the Javascript loading mechanism seems to be changed a bit. When porting a SharePoint 2010 solution to 2013 I found out that sometimes some weird script errors where occuring when calling SharePoint Javascript libraries. On some pages in SharePoint 2013 it happens that not all SharePoint Javascript libraries are loaded because of the built-in lazy loading mechanism. This reduces bandwidth when loading pages, because no unneeded libraries are downloaded to the client. But this causes issues when you want to use not loaded libraries. The following sample Javascript codes shows how you can load some Javascript Libraries and then automatically call your function where you want to use those libraries:

//Register SOD's
SP.SOD.registerSod('core.js', '\u002f_layouts\u002fcore.js');
SP.SOD.executeFunc('core.js', false, function(){});;
SP.SOD.registerSod('sp.js', '\u002f_layouts\u002fsp.js');
SP.SOD.executeFunc('sp.js', false, function(){});
SP.SOD.registerSod('sp.core.js', '\u002f_layouts\u002fsp.core.js');
SP.SOD.executeFunc('sp.core.js', false, function(){});

function doSomething() {
   //Your Logic here which calls sp core libraries
}

// Load asynchronous all needed libraries
ExecuteOrDelayUntilScriptLoaded(function() { ExecuteOrDelayUntilScriptLoaded(doSomething, 'sp.core.js') }, 'sp.js');

In the example above we’re using the SP.SOD library provided with SharePoint. Those existed already in SharePoint 2010 and are still present in 2013. With the SOD library it is possible to lazy load Javascript files and load them on the moment you need them. The sample script exists of three parts. In the first step we register Sod’s (Script on Demand) where we define a key and as value the relative path to the Javascript file. We also call executeFunc to load the file using a dummy function. In the second step we create a custom function. This is the function where you want to call specific methods in the Javascript libraries loaded. Then we call ExecuteOrDelayUntilScriptLoaded. Because in this sample we want both sp.core.js and sp.js loaded, we nest it with another call to ExecuteOrDelayUntilScriptLoaded and finally let the callback call the function which needs the libraries loaded before executing. This method of loading scripts seems to work well in SharePoint 2013 and can also be used for other OOTB Libraries, like the Taxonomy Javascript Library. When your site is still running in SharePoint 2010 mode however, this doesn’t work properly. The registering of Sod’s seems to break with the 2010 way of loading the OOTB Javascript files so there you need only the ExecuteOrDelayUntilScriptLoaded calls. If you need to detect the mode in Javascript you can use the SP.Site.get_compatibilityLevel() function to retrieve that info using JSOM and then dynamically decide which method of loading to use.

SharePoint Migration & Search Part 3: Result Sources

In a few series of posts I will discuss changes in SharePoint Search which might affect you when migrating from SharePoint 2010 to 2013. Search is one of the most changed components in SharePoint 2013 and therefore I split the posts up in four parts covering some subjects you need to know before migrating to SharePoint 2013. All parts will be available with the links below when the posts are available:

Part 1: Search Settings
Part 2: Search Web Parts
Part 3: Search Results Sources
Part 4: Search Result Types and Display Templates

In this post I will cover the new Result Sources functionality in SharePoint 2013 and the impact on SharePoint migrations from SharePoint 2010. When upgraded to SharePoint 2013 your Site Collections will remain in 2010 mode in the beginning. In that mode all functionality which was present in 2010 will keep working including Search Scopes. When upgrading your Site Collection to 2013 mode a few things the Search Scopes will become read only. Editing and deleting is blocked in UI and in the API. When trying to modify Search Scopes from API you will get an exception. When creating Search Scopes using custom code, you need to check in which mode your site collection is running. You can easily implement that by checking the CompatibilityLevel property of the SPSite object:

using(SPSite&nbsp;site = new SPSite(siteUrl)
{
    if(site.CompatibilityLevel == 14)
    { // Add your 2010 mode code here

    }
    else if(site.CompatibilityLevel == 15)
    { // Add your 2013 mode code here

    }
}

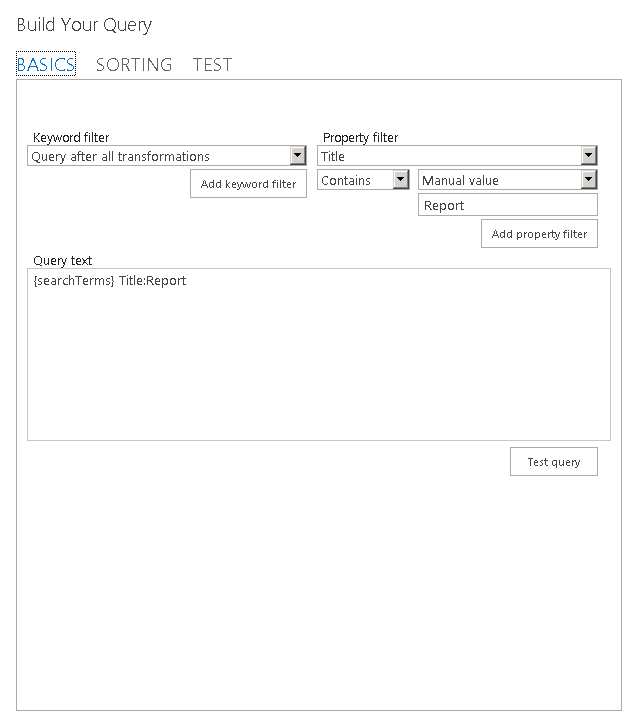
As I explained in Part 2 of these Search series, also the Search Web Parts are changed so that implicates that you need to mitigate Search Scopes. Result Sources are the replacement for this in SharePoint 2013. The Search Scopes can be managed on three levels: Farm, Site Collection and Web. Out of the box SharePoint will provide 16 Result Sources. You can’t edit or delete the default Result Sources, but you can create new ones based on the default ones. Creating can be done on all three levels where Search Settings can be managed, but they will be available only within that scope. When adding a new Result Source a form will open where you can select the source where should be searched in and there is the ability to create custom query transformations using a Query Builder.

QueryBuilder

With the Query Builder it is possible to create custom query transformations using the User Interface.

Within the custom Query’s you can include managed properties which makes it very useful to create Result Scopes for using custom fields and content types. When added a Result Source, you can use it in customized search pages and make it available to end users by adding it in the Search Navigation. There’s a Technet Blogpost which describes this process.

SPWebConfigModification and SharePoint 2013

Sometimes it is needed to modify the web.config to change default ASP.NET settings. Within a  SharePoint environment you don’t want to do this manually, because it is error prone and also the changes are not propagated among all web front end servers in a single farm.

Within SharePoint there is a API called SPWebConfigModification which allows you to programmatically modify the web.config using XPath. The changes are automatically applied on the front ends using a built-in timerjob. In SharePoint 2010 it turned out that this API was not always stable. Some weird behavior is sometimes experienced with removing entries programmatically. According to some sounds from the community we can conclude that that has been fixed. Using that article and some others you will be able to create a solution to modify some attributes in the Web.config. Unfortunately there are not much examples and also MSDN documentation lacks some samples with some more complex XPath modifications using SPWebConfigModification class. In this post I want to show a more complex modifications to the web config the web.config instead of a small sample with only modifying an attribute.

Let’s assume that we want to add the following structure to the web.config to increase the execution timeout setting of a specific applicationpage. We want to add this under the node in the web.config file.

<location path="_layouts/15/PathToApplicationPage.aspx ">
    <system.web>
        <httpRuntime executionTimeout="600" />
    </system.web>
</location>

The SPWebConfigModification API provides methods to add/modify/delete sections, child elements and attributes. Unfortunately this API is not very well documented, which makes it hard the to implement this. It uses internally XPath to modify the web.config XML. It uses a Name and Path which needs to be a unique combination to identify the modification. These variables are needed to perform later operations like updating or deleting when you want to programmatically change your settings. Also the owner field is needed so that you identify which application has made the modification. Suggestion here is to use the assembly full name for the owner field, some unique key for the name and the path in XML where the node/section/attribute should be created/modified. The following code shows a sample of a utility class which you can use as basis for doing SPWebConfigModifications in your own full trust solution:

internal abstract class WebConfigUtility
{
	/// <summary>
	/// Holds the owner
	/// </summary>
	private readonly string owner;

	/// <summary>
	/// Gets or sets the sequence
	/// </summary>
	private uint Sequence
	{
		get;
		set;
	}

	protected WebConfigUtility()
	{
		owner = GetType().FullName;
	}

	/// <summary>
	/// Adds a new xml attribute to the web config file.
	/// </summary>
	/// <param name="name">
	/// Name of the attribute.
	/// </param>
	/// parentPath">
	/// The parent of this attribute.
	/// </param>
	/// <param name="value">
	/// The value of the attribute.
	/// </param>
	protected void CreateAttribute(string name, string parentPath, string value)
	{
		var webConfigModification = new SPWebConfigModification(name, parentPath)
		{
			Owner = owner,
			Sequence = Sequence,
			Type = SPWebConfigModification.SPWebConfigModificationType.EnsureAttribute,
			Value = value
		};
		AddConfigModification(webConfigModification);
	} 

	/// <summary>
	/// Adds a new xml node to the web config file.
	/// </summary>
	/// <param name="name">
	/// Name of the node.
	/// </param>
	/// parentPath">
	/// The parent of this node
	/// </param>
	/// <param name="value">
	/// The value of the node.
	/// </param>
	protected void CreateNode(string name, string parentPath, string value)
	{
		var webConfigModification = new SPWebConfigModification(name, parentPath)
		{
			Owner = owner,
			Sequence = Sequence,
			Type = SPWebConfigModification.SPWebConfigModificationType.EnsureChildNode,
			Value = value
		};
		AddConfigModification(webConfigModification);
	}

	/// <summary>
	/// Only use this if you need to add a section that does not have to be removed and may contain child nodes from other solutions.
	/// </summary>
	/// <param name="name">
	/// The name of the section.
	/// </param>
	/// <param name="parentPath">
	/// The parent path in the web.config file.
	/// </param>
	protected void CreateSection(string name, string parentPath)
	{
		var webConfigModification = new SPWebConfigModification(name, parentPath)
		{
			Owner = owner,
			Sequence = Sequence,
			Type = SPWebConfigModification.SPWebConfigModificationType.EnsureSection
		};
		AddConfigModification(webConfigModification);
	}

	/// <summary
	/// Adds the config modification.
	/// </summary>
	/// <param name="modification">
	/// The modification to apply.
	/// </param>
	private void AddConfigModification(SPWebConfigModification modification)
	{
		WebConfigModifications.Add(modification);
		Sequence++;
	}

	/// <summary>
	/// Removes the modifications of the webconfig of the current webapplication.
	/// </summary>
	/// <param name="webApplication">
	/// The web application.
	/// </param>
	internal void RemoveInternal(SPWebApplication webApplication)
	{
		if (webApplication == null)
		{
			throw new ArgumentNullException("webApplication");
		} 

		var toRemove = webApplication.WebConfigModifications.Where(modification => modification != null).Where(modification => string.Compare(modification.Owner, owner, true, CultureInfo.CurrentCulture) == 0).ToList(); 

		foreach (var modification in toRemove)
		{
			webApplication.WebConfigModifications.Remove(modification);
		} 

		UpdateWebConfig(webApplication);
	}

	/// <summary>
	/// Updates the webconfig of the current webapplication with the modifications.
	/// </summary>
	/// <param name="webApplication">
	/// The webapplication that needs to be configured.
	/// </param>
	protected void UpdateWebConfig(SPWebApplication webApplication)
	{
		try
		{
			webApplication.Update();
			webApplication.WebService.ApplyWebConfigModifications();
		}
		catch (Exception ex)
		{
                      // Add your exception handling and logging here
		}
	}
}

Let’s consider our first example and the helper class above to create the modifications:

CreateNode("location[@path='_layouts/15/PathToApplicationPage.aspx']", "configuration", "");

In this sample we add a new node. As name we specify a unique name which can be used to identify it later on. The second parameter is a path. This is configuration as we want to store the node under the configuration key. Please choose a different path when you need to create the node on a different location. The last parameter is the actual value. You can then use the UpdateWebConfig method together with a SPWebApplication object to save the changes. Also methods are included for removal which works in a similar way.

SharePoint Migration & Search Part 2: Search Web Parts

In a few series of posts I will discuss changes in SharePoint Search which might affect you when migrating from SharePoint 2010 to 2013. Search is one of the most changed components in SharePoint 2013 and therefore I split the posts up in four parts covering some subjects you need to know before migrating to SharePoint 2013. All parts will be available with the links below when the posts are available:

Part 1: Search Settings
Part 2: Search Web Parts
Part 3: Search Results Sources
Part 4: Search Result Types and Display Templates

In this post I will describe the changes to Search Web Parts in-depth. These Web Parts were changed as part of the new search platform which is available in SharePoint 2013.

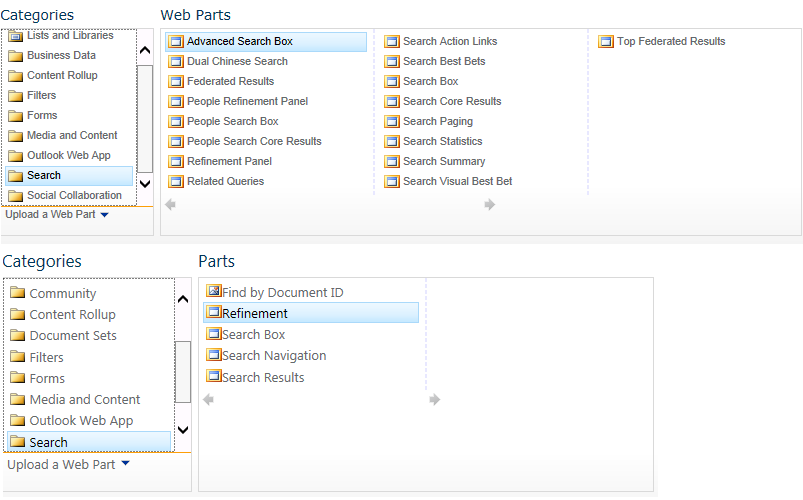
First thing you’ll notice when using SharePoint 2013 is the number of search Web Parts available. When you want to add a search Web Part you see that the number of Web Parts has been reduced drastically.SearchWebParts

When you look to this list at the first time it looks like a lot of search functionality is missing in SharePoint 2013. But that’s not right as we will see later. The best way how to show that is on the results page in a OOTB Search Center and let’s see the difference in number Web Parts in edit mode.

Search Results Page SharePoint 2010

The search results page in a search center in SharePoint 2010 contains a lot of Web Parts to display all information.

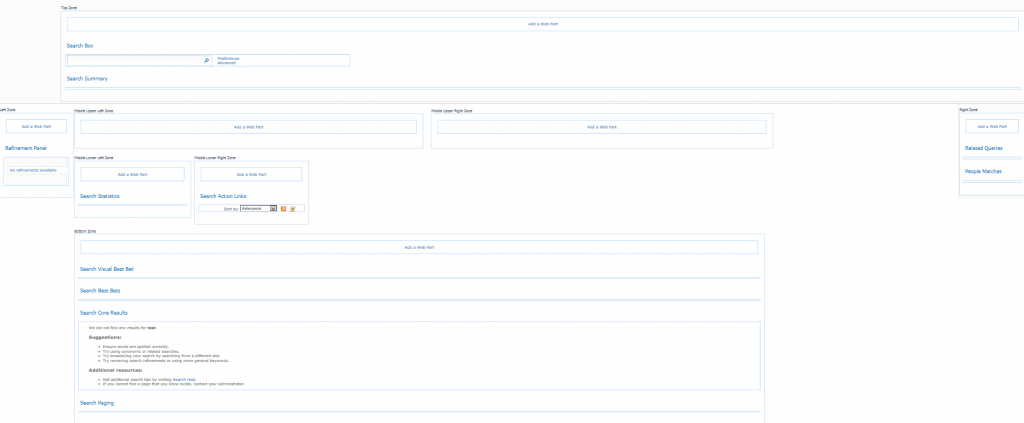
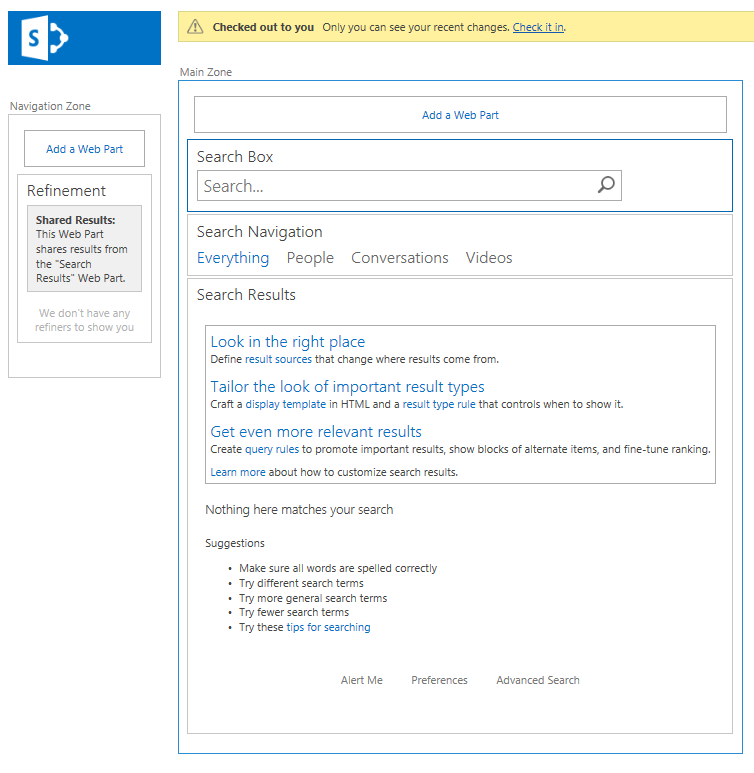
Let’s compare this to the same page when using a SharePoint 2013 Search Center:

The Search Results Page in SharePoint 2013 contains only a few Web Parts.

The Search Results Page in SharePoint 2013 contains only a few Web Parts.

There is a simple clarification for this enormous reduction of a number of Search Web Parts and that is integration. The new Search Result Web Part is now containing the functionality of a lot of other Web Parts like the Search Paging, Search Statistics, People Search Results, etc. This is a major advantage when maintaining and configuring search Web Parts.

Another major change is the way how the Web Parts are configured. In 2010 and before XSLT was the way to go when changing the search results being displayed. In 2013 this has been removed and you need to use Display Templates. Those Display Templates can be coupled to Result Types. Based on the type of search results you can customize the way search results are displayed. I will cover this more in-depth in part 3 of these series of articles. This implies that you need to change your customized search functionality in your solutions if you’re using it and want to use customized search results.

As probably already noticed Search Scopes are deprecated in SharePoint 2013. Deprecated means that no new scopes can be created and existing scopes are read-only (this is also blocked from API). This also has implications for the Search Web Parts. The new Search Web Parts don’t provide support for Search Scopes but only for result sources. For example, the scopes drop down functionality is no longer part of the Search Box Web Part.

Another thing to mention is the Site Collection Upgrade. When using a standard Search Center without modifications there is nothing to be done. The Site Upgrade handles the transition automatically. In case you are using search Web Parts outside a Search Center the upgrade process does not replace the Web Parts! This will results is some glitches.
First problem you’ll notice is the styling. The old Web Parts do not comply with the 2013 style sheets which results in big buttons and other similar ugly glitches. Make sure you have an upgrade strategy ready for this and mitigate this using custom feature upgrades or manual steps after the Site Upgrade! Replacing the Web Parts can only be done after Site Upgrade. The 2013 Search Web Parts won’t work when in 2010 mode!
Another thing I’ve noticed is that when still using the old Web Parts in 2013 mode, is that the search scopes are not respected anymore. SharePoint uses in 2013 a different way of creating the search URL’s and these are not compatible with the old Web Parts. That results for example that an All Site scope search automatically results in a search on whole SharePoint. Again the only way to resolve this is by replacing the Web Parts. An approach there is to create new 2013 search pages in your solution in a subfolder and using a feature reactivation provision these on new sites and also update the search configuration as mentioned in Part 1 of the series.

To conclude this post I will provide an overview of all Search Web Parts available in 2010 and 2013:

SharePoint 2010 SharePoint 2013
Advanced Search Box Advanced Search Box*
Dual Chinese Search Search Box
Federated Results Search Navigation
People Refinement Panel Search Results
People Search Box Refinement
People Search Core Results
Refinement Panel
Related Queries
Search Action Links
Search Best Bets
Search Box
Search Core Results
Search Paging
Search Statistics
Search Summary
Search Visual Best Bet
Top Federated Results

* The Advanced Search Web Part is missing in the Web Part gallery but it still part of SharePoint. It is still possible to use that Web Part, but you need to export it from a Search Center and import the .webpart file in your site to use it.


SharePoint Migration & Search Part 1: Search Settings

In a few series of posts I will discuss changes in SharePoint Search which might affect you when migrating from SharePoint 2010 to 2013. Search is one of the most changed components in SharePoint 2013 and therefore I split the posts up in four parts covering some subjects you need to know before migrating to SharePoint 2013. All parts will be available with the links below when the posts are available:

Part 1: Search Settings
Part 2: Search Web Parts
Part 3: Search Results Sources
Part 4: Search Result Types and Display Templates

In this post I will cover the search settings in-depth. But first some general information about what has happened to the Search component in SharePoint 2013 compared to 2010. In SharePoint 2010 we had actually three options for search:
– SharePoint Foundation Search
– SharePoint Enterprise Search
– FAST

In 2013 the FAST search engine is fully integrated into SharePoint and there is only a difference in features for search based on the three types of licenses (Foundation, Standard and Enterprise). See a list of feature comparisons for a quick overview for differences between editions within search. This automatically implies changes to the search functionality on different levels. In this post we’ll focus on the Search Settings for Site Collections and Sites where some things has been changed.

In SharePoint 2010, Search Settings could be managed per Site Collection using the Search Settings link when going to Site Settings:

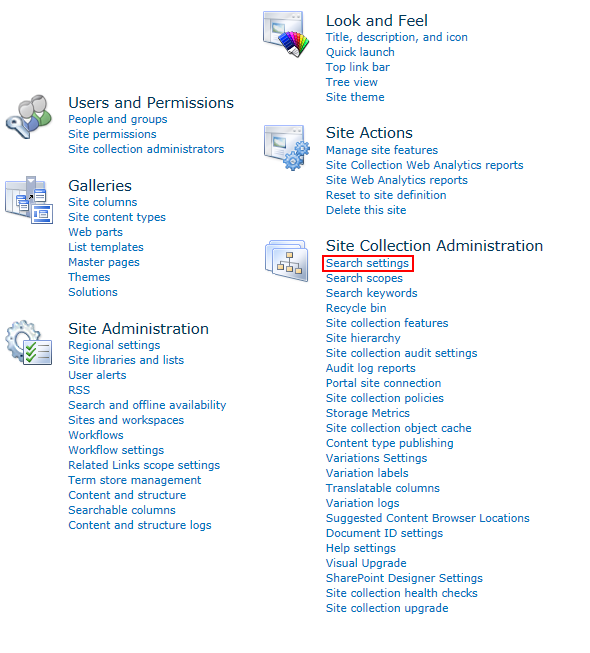
Search Settings Link in 2010 on Site Settings Page

Search Settings Link in 2010 on Site Settings Page

On the Search Settings page itself you were able to set settings like enabling custom scopes, set the drop down mode for Search Boxes and specify the Site Collection Search Results Page. Those settings where actually kept in the property bag of the rootWeb of a Site Collection. See the picture below for the mapping of the properties in 2010:

Search Settings in 2010 with Propertynames of properties stored in propertybag

Search Settings in 2010 with Propertynames of properties stored in propertybag

* Note the spell error in the Search Results Page propertyname. This was a spell mistake which was there in the SharePoint product itself.

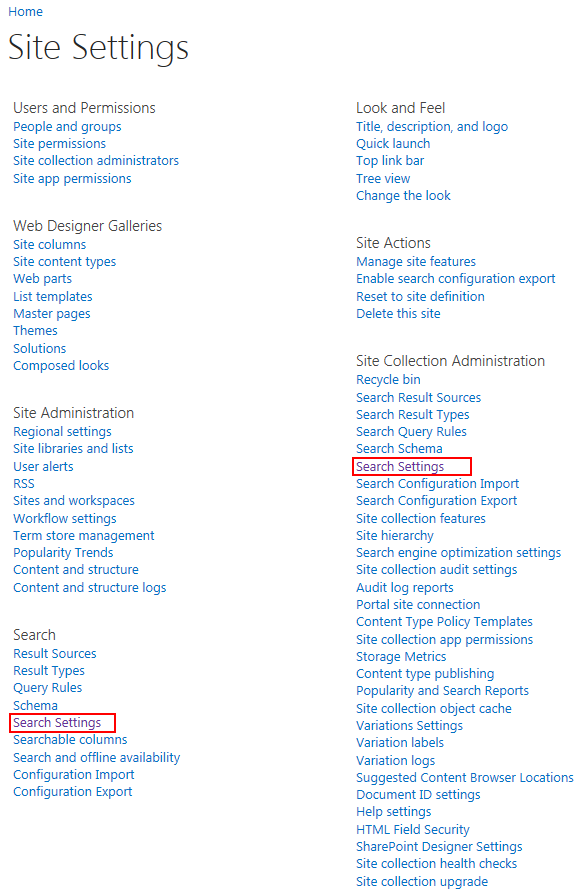
When you upgrade a Site Collection using Visual Upgrade or so-called Site Collection Upgrade to 2013 mode we will notice a few differences. First when we browse to the Site Settings page you’ll notice two Search Settings links. The first one on the left is on Site Level and the second one on the righ is on Site Collection Level:

Search Settings are in 2013 available on two different levels when browsing Site Settings page.

Search Settings are in 2013 available on two different levels.

When browsing to Site Collection Level Search Settings you’ll notice that all settings from before the upgrade are lost:

Default Search Settings after visual upgrade. All customized settings seems to be lost.

Default Search Settings after visual upgrade. All customized settings seems to be lost.

As you see in the screenshot all old settings seems to be lost and reset to default values. When diving into the property bag on the rootWeb we’ll notice that internally new properties are used to store the settings and the Visual Upgrade doesn’t migrate those settings automatically. I’ve marked the properties in the next screenshot for Site Collection Level:

Search Propertynames mapped to the settings in the User Interface in 2013.

Search Propertynames mapped to the settings in the User Interface in 2013.

As you can see two new properties have been introduced. You’ll also notice the SITE in the name of the property. This has to do with the scoping of the search settings. When you store these settings on a web, then the SITE in the property name is replaced with WEB. The setting which is the lowest in the tree takes precedence. So if you set it on Web Level, that web will only look at the web setting, otherwise it will look at Site Level. The following schema shows how the settings are actually stored per level:

SearchSettingsSchema

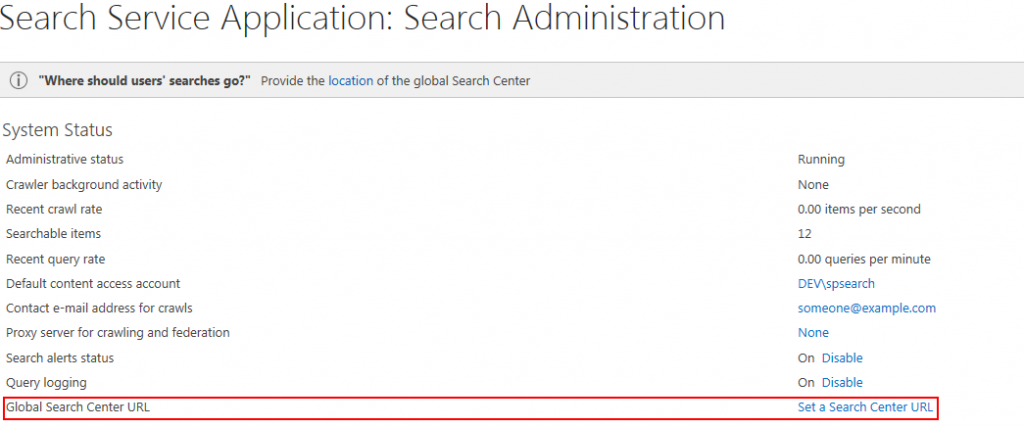
In the schema some examples are shown. Lets start with Web 2 which is a sub site under Site Collection 1. On Site Collection 1 the search settings are applied and stored in the  property bag of the rootWeb (haven’t shown this in the schema to keep it clean). Because Web 2 doesn’t have specific Search Settings it will by default take the settings from the Site Collection 1. Web 1, which is also a sub site under Site Collection 1 has specific settings on Web Level and will use them instead of using the Site Collection Level settings. There’s also one exception which is not shown in the schema. You can set the Search Center URL also in the Search Service Application and then also all associated Web Applications can use that setting. But it will only be used when it is not set at Web or Site Collection Level! The screenshot below shows where you can specify this setting on Service Application Level:

Search Center URL can also be specified in Search Service Application.

Search Center URL can also be specified in Search Service Application.

For the inner structure of the properties I want to refer to the article of Radu Tut about Search Box Settings as there is already written a lot about this on the internet. A scenario which hasn’t mentioned a lot is how you can migrate the old settings to the new ones. It cannot be done OOTB, you’ll need PowerShell scripts, custom-made CSOM tooling or Server Side Code to do this. When you are using custom Farm solutions with a custom feature to set the Search Settings it might be very powerful to use Feature Upgrades to apply the new settings using code. In combination with the article of Radu Tut you should be able to create an upgrade yourself and invoke it using Powershell Scripts.