SharePoint Migration & Search Part 2: Search Web Parts

In a few series of posts I will discuss changes in SharePoint Search which might affect you when migrating from SharePoint 2010 to 2013. Search is one of the most changed components in SharePoint 2013 and therefore I split the posts up in four parts covering some subjects you need to know before migrating to SharePoint 2013. All parts will be available with the links below when the posts are available:

Part 1: Search Settings
Part 2: Search Web Parts
Part 3: Search Results Sources
Part 4: Search Result Types and Display Templates

In this post I will describe the changes to Search Web Parts in-depth. These Web Parts were changed as part of the new search platform which is available in SharePoint 2013.

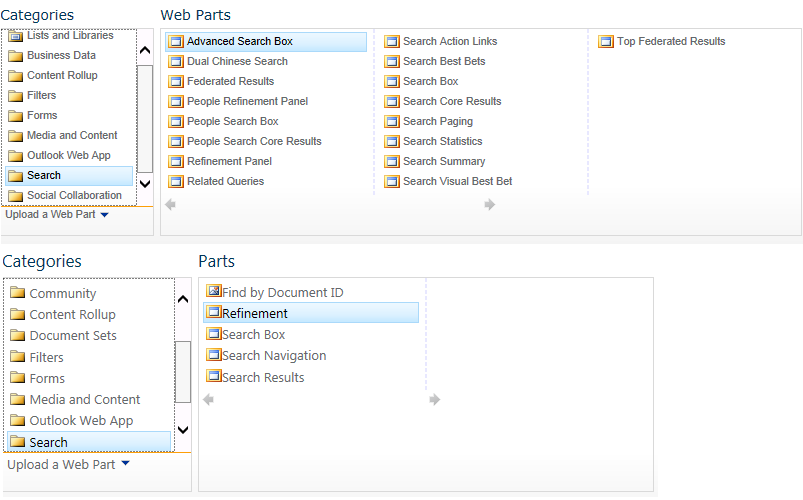
First thing you’ll notice when using SharePoint 2013 is the number of search Web Parts available. When you want to add a search Web Part you see that the number of Web Parts has been reduced drastically.SearchWebParts

When you look to this list at the first time it looks like a lot of search functionality is missing in SharePoint 2013. But that’s not right as we will see later. The best way how to show that is on the results page in a OOTB Search Center and let’s see the difference in number Web Parts in edit mode.

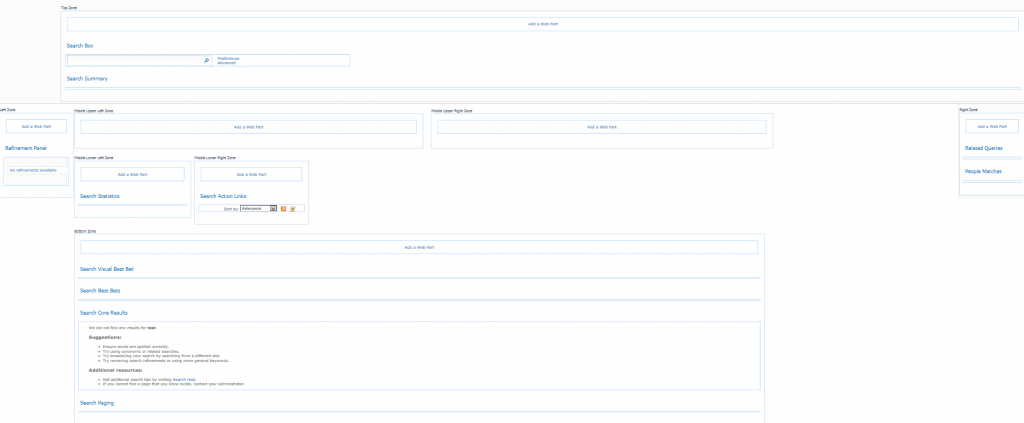
Search Results Page SharePoint 2010

The search results page in a search center in SharePoint 2010 contains a lot of Web Parts to display all information.

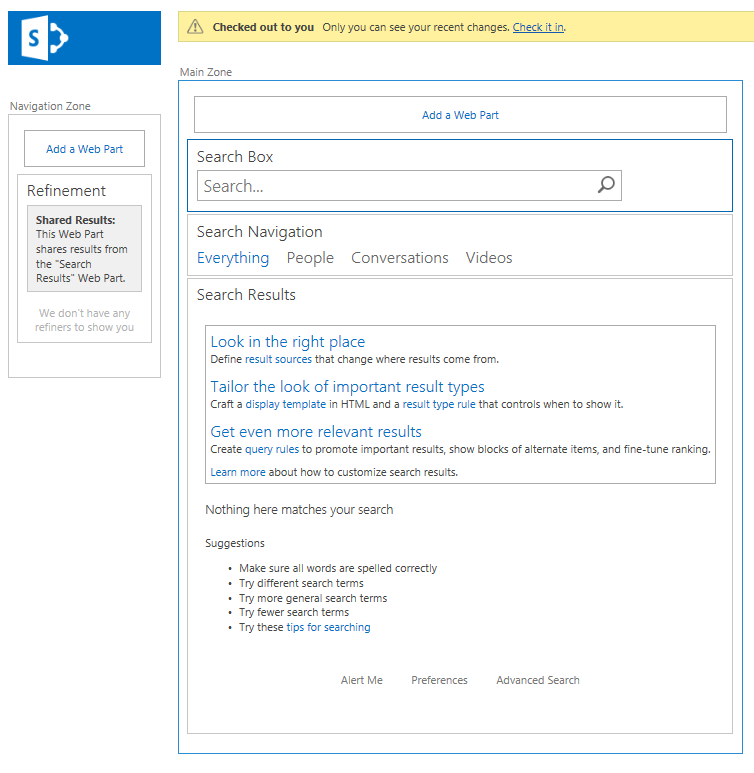
Let’s compare this to the same page when using a SharePoint 2013 Search Center:

The Search Results Page in SharePoint 2013 contains only a few Web Parts.

The Search Results Page in SharePoint 2013 contains only a few Web Parts.

There is a simple clarification for this enormous reduction of a number of Search Web Parts and that is integration. The new Search Result Web Part is now containing the functionality of a lot of other Web Parts like the Search Paging, Search Statistics, People Search Results, etc. This is a major advantage when maintaining and configuring search Web Parts.

Another major change is the way how the Web Parts are configured. In 2010 and before XSLT was the way to go when changing the search results being displayed. In 2013 this has been removed and you need to use Display Templates. Those Display Templates can be coupled to Result Types. Based on the type of search results you can customize the way search results are displayed. I will cover this more in-depth in part 3 of these series of articles. This implies that you need to change your customized search functionality in your solutions if you’re using it and want to use customized search results.

As probably already noticed Search Scopes are deprecated in SharePoint 2013. Deprecated means that no new scopes can be created and existing scopes are read-only (this is also blocked from API). This also has implications for the Search Web Parts. The new Search Web Parts don’t provide support for Search Scopes but only for result sources. For example, the scopes drop down functionality is no longer part of the Search Box Web Part.

Another thing to mention is the Site Collection Upgrade. When using a standard Search Center without modifications there is nothing to be done. The Site Upgrade handles the transition automatically. In case you are using search Web Parts outside a Search Center the upgrade process does not replace the Web Parts! This will results is some glitches.
First problem you’ll notice is the styling. The old Web Parts do not comply with the 2013 style sheets which results in big buttons and other similar ugly glitches. Make sure you have an upgrade strategy ready for this and mitigate this using custom feature upgrades or manual steps after the Site Upgrade! Replacing the Web Parts can only be done after Site Upgrade. The 2013 Search Web Parts won’t work when in 2010 mode!
Another thing I’ve noticed is that when still using the old Web Parts in 2013 mode, is that the search scopes are not respected anymore. SharePoint uses in 2013 a different way of creating the search URL’s and these are not compatible with the old Web Parts. That results for example that an All Site scope search automatically results in a search on whole SharePoint. Again the only way to resolve this is by replacing the Web Parts. An approach there is to create new 2013 search pages in your solution in a subfolder and using a feature reactivation provision these on new sites and also update the search configuration as mentioned in Part 1 of the series.

To conclude this post I will provide an overview of all Search Web Parts available in 2010 and 2013:

SharePoint 2010 SharePoint 2013
Advanced Search Box Advanced Search Box*
Dual Chinese Search Search Box
Federated Results Search Navigation
People Refinement Panel Search Results
People Search Box Refinement
People Search Core Results
Refinement Panel
Related Queries
Search Action Links
Search Best Bets
Search Box
Search Core Results
Search Paging
Search Statistics
Search Summary
Search Visual Best Bet
Top Federated Results

* The Advanced Search Web Part is missing in the Web Part gallery but it still part of SharePoint. It is still possible to use that Web Part, but you need to export it from a Search Center and import the .webpart file in your site to use it.


SharePoint Migration & Search Part 1: Search Settings

In a few series of posts I will discuss changes in SharePoint Search which might affect you when migrating from SharePoint 2010 to 2013. Search is one of the most changed components in SharePoint 2013 and therefore I split the posts up in four parts covering some subjects you need to know before migrating to SharePoint 2013. All parts will be available with the links below when the posts are available:

Part 1: Search Settings
Part 2: Search Web Parts
Part 3: Search Results Sources
Part 4: Search Result Types and Display Templates

In this post I will cover the search settings in-depth. But first some general information about what has happened to the Search component in SharePoint 2013 compared to 2010. In SharePoint 2010 we had actually three options for search:
– SharePoint Foundation Search
– SharePoint Enterprise Search
– FAST

In 2013 the FAST search engine is fully integrated into SharePoint and there is only a difference in features for search based on the three types of licenses (Foundation, Standard and Enterprise). See a list of feature comparisons for a quick overview for differences between editions within search. This automatically implies changes to the search functionality on different levels. In this post we’ll focus on the Search Settings for Site Collections and Sites where some things has been changed.

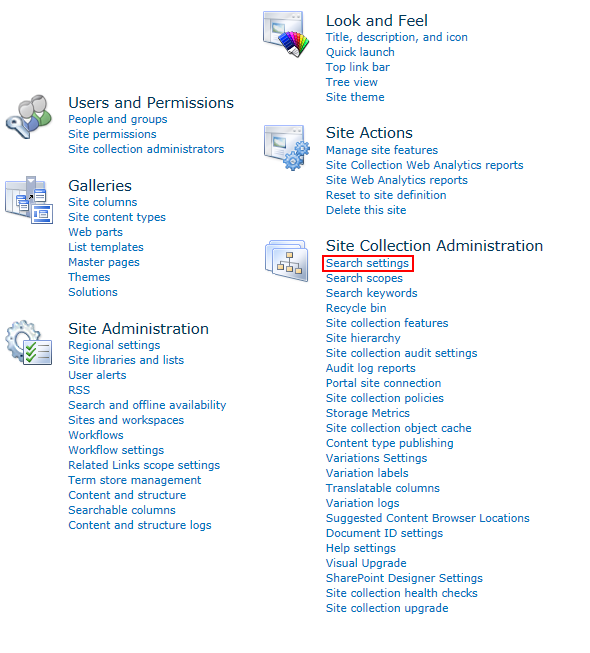
In SharePoint 2010, Search Settings could be managed per Site Collection using the Search Settings link when going to Site Settings:

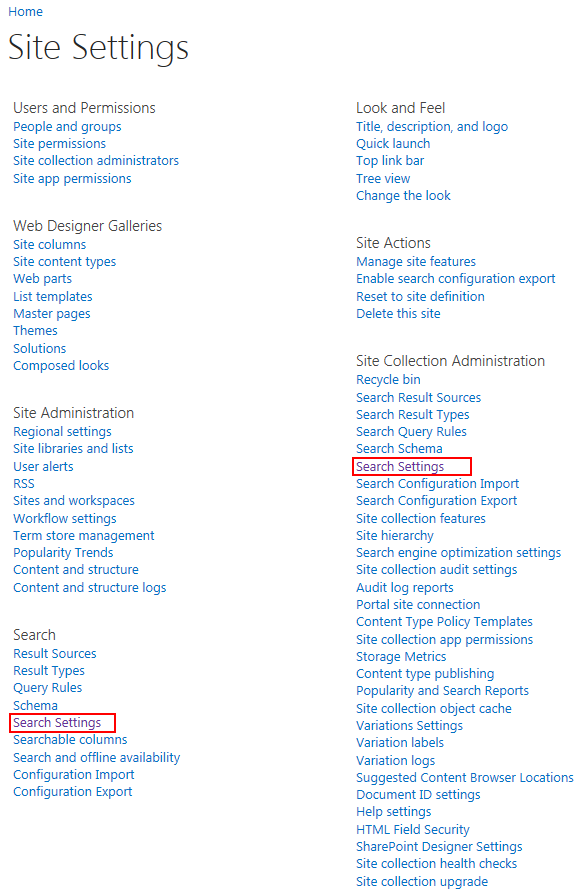
Search Settings Link in 2010 on Site Settings Page

Search Settings Link in 2010 on Site Settings Page

On the Search Settings page itself you were able to set settings like enabling custom scopes, set the drop down mode for Search Boxes and specify the Site Collection Search Results Page. Those settings where actually kept in the property bag of the rootWeb of a Site Collection. See the picture below for the mapping of the properties in 2010:

Search Settings in 2010 with Propertynames of properties stored in propertybag

Search Settings in 2010 with Propertynames of properties stored in propertybag

* Note the spell error in the Search Results Page propertyname. This was a spell mistake which was there in the SharePoint product itself.

When you upgrade a Site Collection using Visual Upgrade or so-called Site Collection Upgrade to 2013 mode we will notice a few differences. First when we browse to the Site Settings page you’ll notice two Search Settings links. The first one on the left is on Site Level and the second one on the righ is on Site Collection Level:

Search Settings are in 2013 available on two different levels when browsing Site Settings page.

Search Settings are in 2013 available on two different levels.

When browsing to Site Collection Level Search Settings you’ll notice that all settings from before the upgrade are lost:

Default Search Settings after visual upgrade. All customized settings seems to be lost.

Default Search Settings after visual upgrade. All customized settings seems to be lost.

As you see in the screenshot all old settings seems to be lost and reset to default values. When diving into the property bag on the rootWeb we’ll notice that internally new properties are used to store the settings and the Visual Upgrade doesn’t migrate those settings automatically. I’ve marked the properties in the next screenshot for Site Collection Level:

Search Propertynames mapped to the settings in the User Interface in 2013.

Search Propertynames mapped to the settings in the User Interface in 2013.

As you can see two new properties have been introduced. You’ll also notice the SITE in the name of the property. This has to do with the scoping of the search settings. When you store these settings on a web, then the SITE in the property name is replaced with WEB. The setting which is the lowest in the tree takes precedence. So if you set it on Web Level, that web will only look at the web setting, otherwise it will look at Site Level. The following schema shows how the settings are actually stored per level:

SearchSettingsSchema

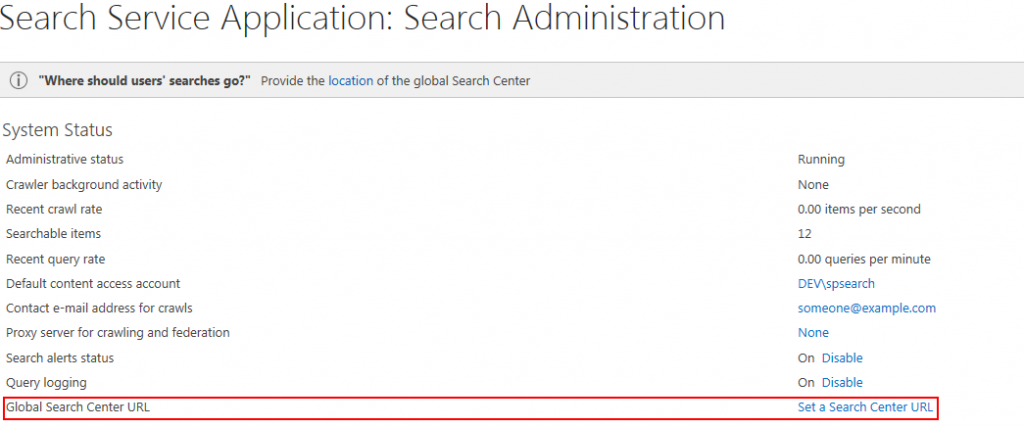
In the schema some examples are shown. Lets start with Web 2 which is a sub site under Site Collection 1. On Site Collection 1 the search settings are applied and stored in the  property bag of the rootWeb (haven’t shown this in the schema to keep it clean). Because Web 2 doesn’t have specific Search Settings it will by default take the settings from the Site Collection 1. Web 1, which is also a sub site under Site Collection 1 has specific settings on Web Level and will use them instead of using the Site Collection Level settings. There’s also one exception which is not shown in the schema. You can set the Search Center URL also in the Search Service Application and then also all associated Web Applications can use that setting. But it will only be used when it is not set at Web or Site Collection Level! The screenshot below shows where you can specify this setting on Service Application Level:

Search Center URL can also be specified in Search Service Application.

Search Center URL can also be specified in Search Service Application.

For the inner structure of the properties I want to refer to the article of Radu Tut about Search Box Settings as there is already written a lot about this on the internet. A scenario which hasn’t mentioned a lot is how you can migrate the old settings to the new ones. It cannot be done OOTB, you’ll need PowerShell scripts, custom-made CSOM tooling or Server Side Code to do this. When you are using custom Farm solutions with a custom feature to set the Search Settings it might be very powerful to use Feature Upgrades to apply the new settings using code. In combination with the article of Radu Tut you should be able to create an upgrade yourself and invoke it using Powershell Scripts.

Asset Library changes in SharePoint 2013

In SharePoint 2010 a new library type has been introduced called Asset Library. This Library is very suitable for storing rich media content like Audio, Video and Images. The library also contains a view by default which shows thumbnails. In SharePoint 2013 this functionality has been changed slightly. In this post I will mention some changed functionality and also some internal technical changes, which you need to know when using it in custom web templates or code.

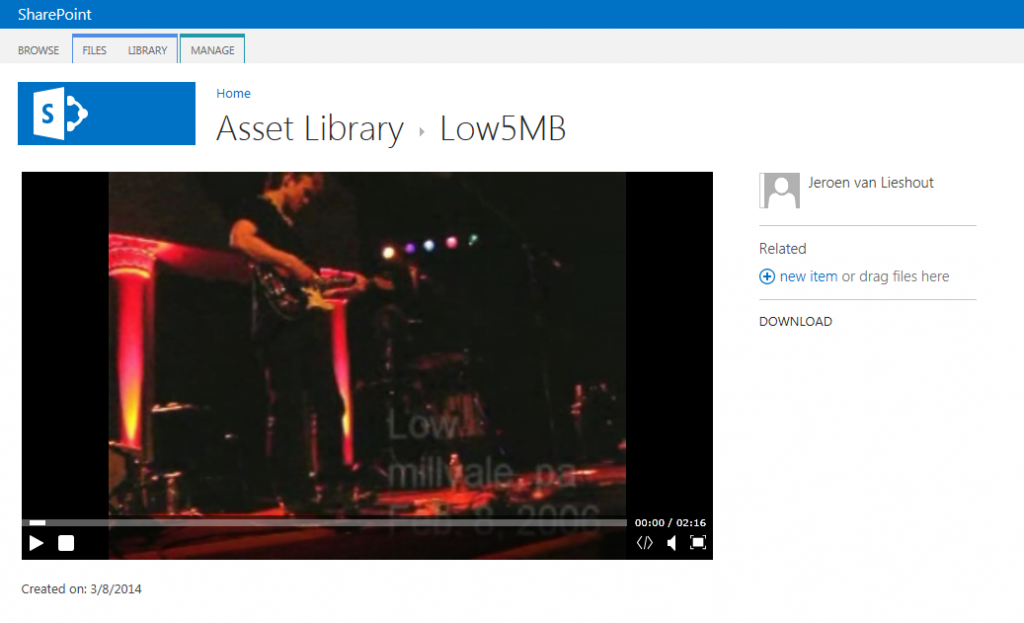
The most major change in 2013 is the ability to play audio and video directly from browser. SharePoint contains two players to support that. One is a Silverlight player and the other is a HTML5 player. The HTML5 player uses the audio and video tags to accomplish that. Video’s can be played by using the context menu on a video or audio file and then choose for play. Then the video is played directly from browser:

The video player in SharePoint 2013 which allows to play video's directly from browser.

The video player in SharePoint 2013 which allows to play video’s directly from browser.

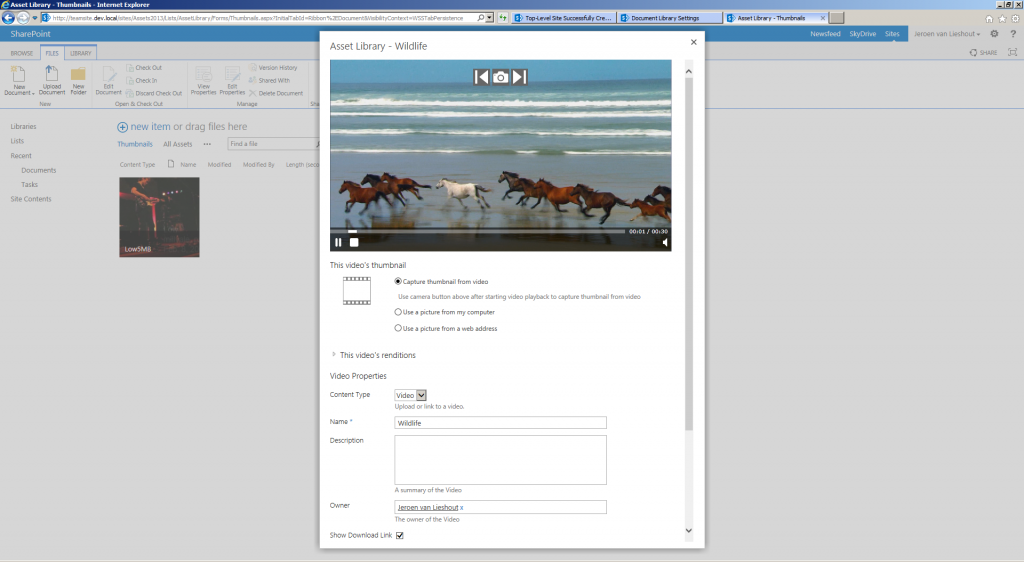
The video functionality has been extended more then only playing them from browsers. From now you can also select thumbnails which you want to show in the Asset Library when browsing through all items. When uploading the video the end user can select an option to choose a fragment from the video as thumbnail, upload a thumbnail image or use a picture from the web:

The upload video screen shows the option to select a thumbnail directly from video, image or web address.

The upload video screen shows the option to select a thumbnail directly from video, image or web address.

As seen in the screenshot the video can be played and the snapshot button can be used to select the frame for thumbnail. This is pretty cool functionality which is very helpful for end users to recognize the video’s uploaded other than only the filename.

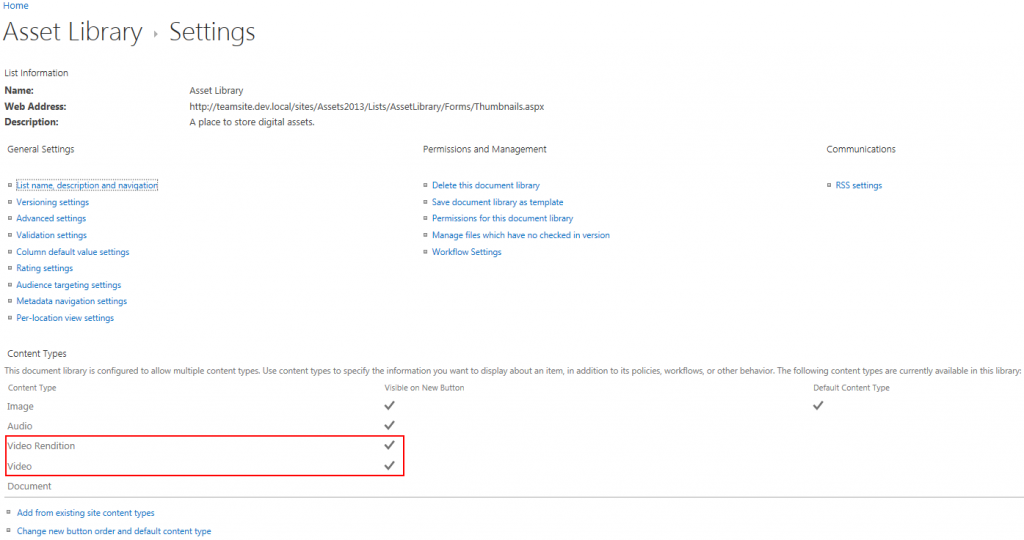
To make this new functionality possible the inner workings of the video content type has been changed slightly. A new video content type is now added directly to the Asset Library when creating one. The old video content type is now called “Video Rendition”.

When creating a new Asset Library two video content types are associated by default.

When creating a new Asset Library two video content types are associated by default.

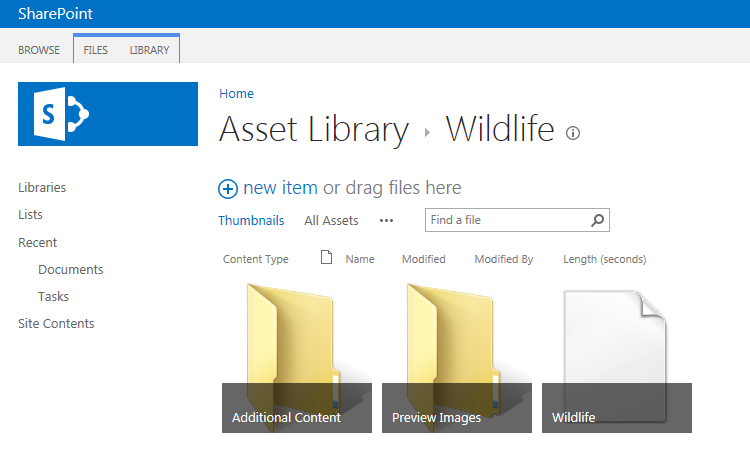
When migrating a site from 2010 to 2013 mode it will leave old video’s with the old content type. The new content type is inheriting from Document Set indirectly instead of a Rich Media Asset as with the old content type. This has been done to make it possible to invisible store the thumbnail images for the video. When opening the Document Set indirectly by modifying the URL we can see the actual folder contents of a video:

The video file itself is actually a folder containing some subfolders and the video itself.

The video file itself is actually a folder containing some sub folders and the video itself.

As you can see there is a folder named Additional Content, Preview Images and a file called Wildlife. Wildlife is in this example the video itself, which is called a Video Rendition. One video can contain multiple renditions so its possible to have multiple video’s here. I will come back to that later. The Preview Images folder actually contains the thumbnail images which are uploaded for the video or generated for the video. The Additional Content might contain other files but is most of the times empty. The player page which is opened when opening a video is actually a Document Set Welcome Page which is associated to the Video Content Type. It opens automatically a page called Forms/Video/videoplayerpage.aspx. So if you want to customize something with video’s and players then you can start there already.

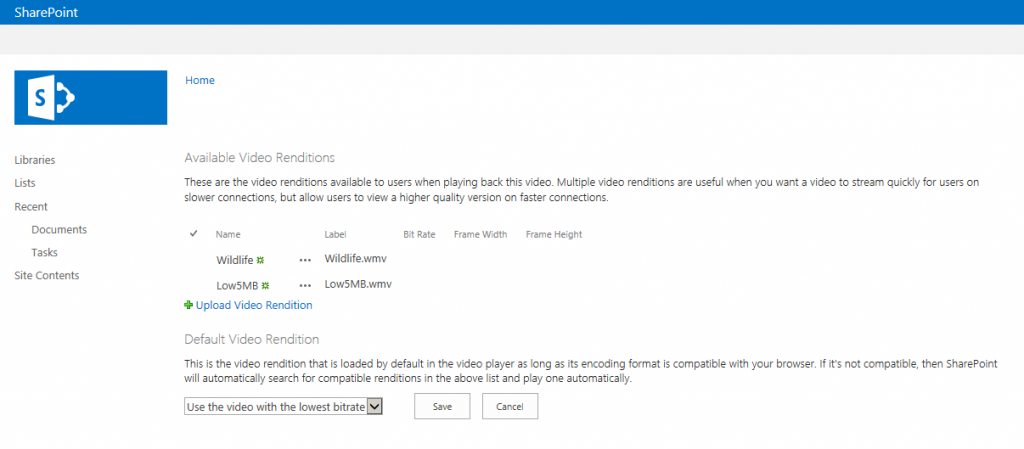
Now let’s come back to video renditions. It is a feature to make it possible to provide video’s for users with a lower bandwidth available or doesn’t want to download a high resolution version. For video’s this can be managed from the edit properties page for a video and then on the down left corner you can manage the video renditions.

Video Renditions

The video rendition page makes it possible to upload multiple versions of a video. When the bit rate is specified as metadata then this will be used to automatically show the video with the lowest bit rate. It is also possible to force one version to be shown as default. This can be managed per video individually.

Another thing which is new is that you are able to configure some settings for video processing and playback settings. These settings can be managed by going to the content type settings:

VideoSettings

The settings screen provides the ability to enable/disable automatic metadata extraction and preview image from video’s uploaded. Also preview from video renditions hosted outside SharePoint can be enabled/disabled.

To conclude this post we summarize the most important things changed in Asset Libraries:
– New video content type added
– Playback of audio/video in browser added
– Video renditions added
– Thumbnails for video’s customizable

A side note it that to enable this functionality the Video and Rich Media Site Collection feature needs to be enabled. At least this is the case for some out of the box templates but in our case at a customer this wasn’t the case in a custom web template. Make sure you add the following to your ONET file to the site features section to enable this functionality:

<Feature ID="6e1e5426-2ebd-4871-8027-c5ca86371ead" />

Disable Inline Editing on migrated sites

In SharePoint 2013 a new type of list view has been made available to end users with the ability to search within a list or document library easily. In some cases when you have migrated sites from a SharePoint 2010 farm to a new SharePoint 2013 farm this new list view is not available. This might have to do with Inline Editing settings on your list views.

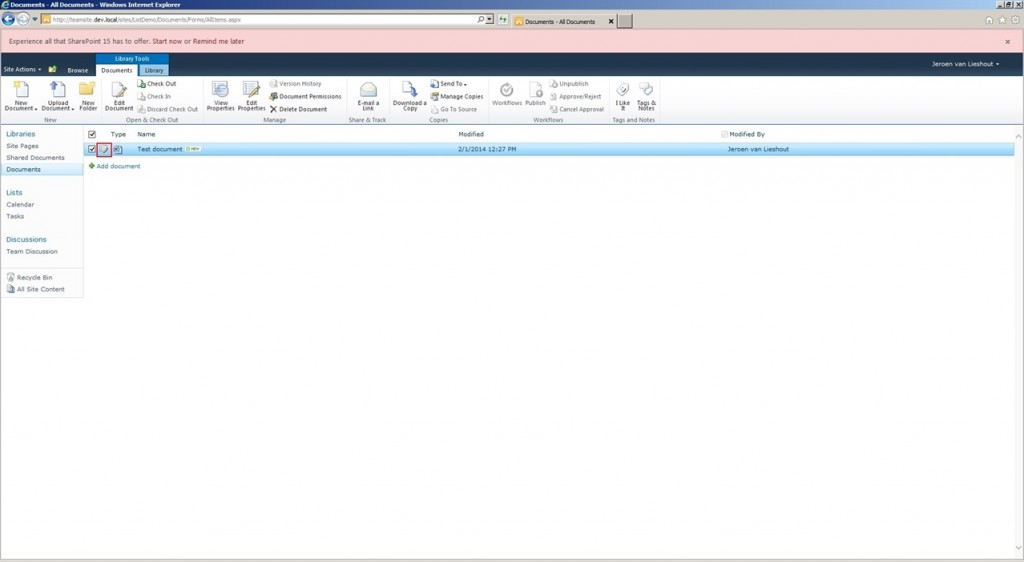
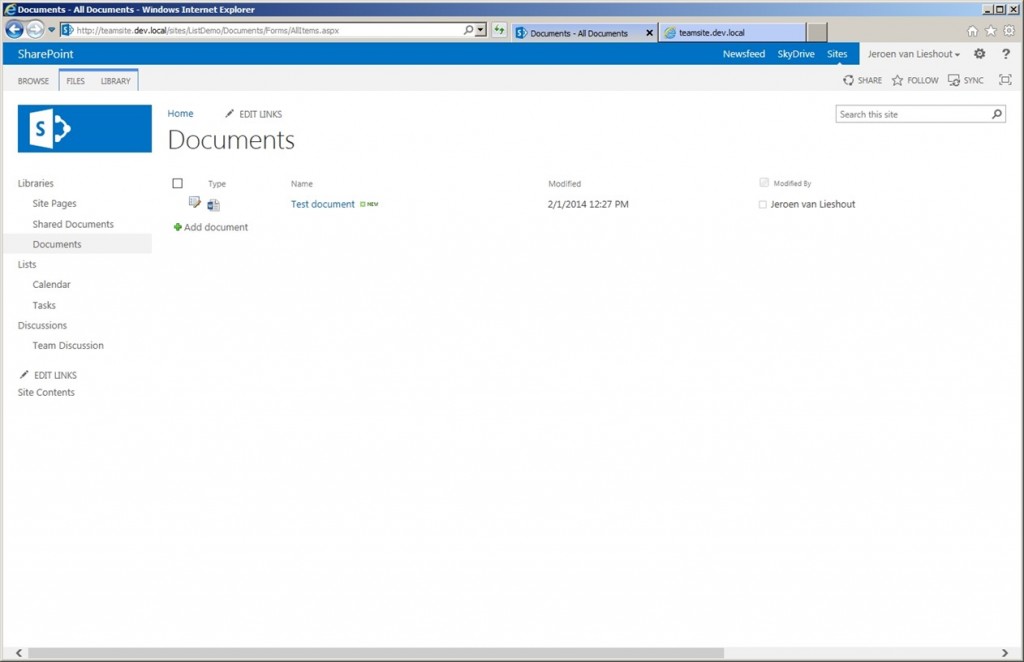
In SharePoint 2010 there was an option to make it possible for end users to change properties of listitems or documents in a list view. This feature is called Inline Editing and made it much easier for users to change properties with less effort. You can see if Inline Editing is set by selecting a document or listitem in the list and then an edit icon becomes visible:
020114_1215_DisableInli1.jpg

To modify this setting you go to the Library tab in the ribbon and then click on modify view. Under Inline Editing you can select the checkbox to enable it. By default this setting is disabled:

020114_1215_DisableInli2.jpg

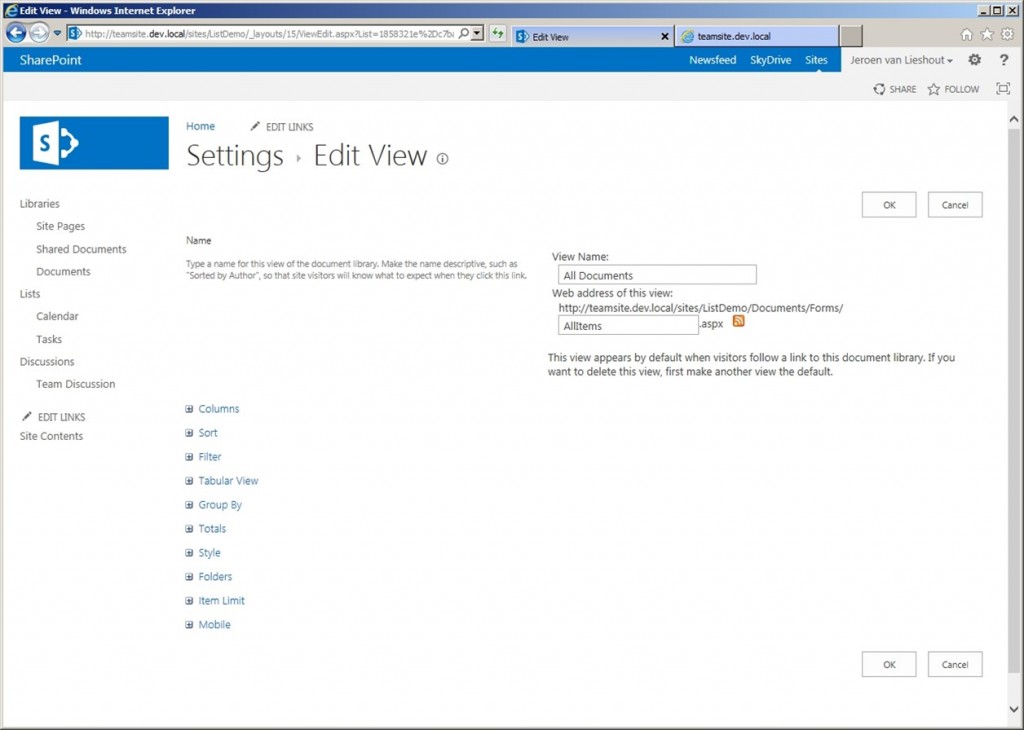
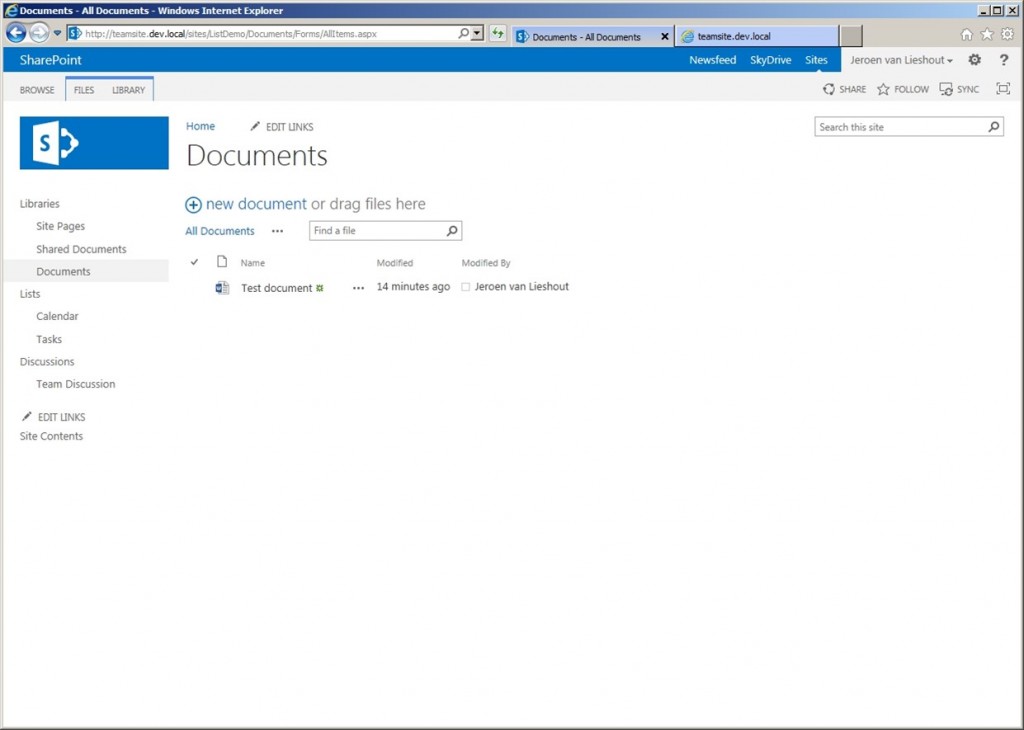
When you have lists or libraries in your site with views with these settings enabled you will face issues after upgrading to SharePoint 2013 mode. After upgrading you’ll see the following list view in 2013 mode:

020114_1215_DisableInli3.jpg

At this moment we are not facing issues directly. But we will see that there’s a problem if we want to change this setting. Let’s go to the Library tab in the ribbon and click on modify view. The following options are available and we’re missing something:020114_1215_DisableInli4.jpg

As you can see the Inline Editing option has been removed from the User Interface and it is not possible for site owners or list owners to modify these settings on views anymore. But after some research I found that there’s a workaround for this problem.

To fix it you have several options:

  • Delete views with issue and recreate them with default settings
  • Use SharePoint Manager to delete property manually
  • Use custom code to remove the property

In this post I’ll show the second option. The first option is not feasible in every environment, because you’ll lose all created views with these issues and will need to reconfigure them manually. The second option is only feasible if you don’t have a lot of lists and libraries with this issue but when it’s more work to recreate the views completely. It’s also only an option when having a on-premise farm. When using Office 365 you can’t use SharePoint Manager, so then your only options left is to create a sandbox solution to fix it or create a CSOM tool which fixes this remotely. I will show here the solution in general using SharePoint Manager. With custom code it isn’t that hard, because the principles are the same.

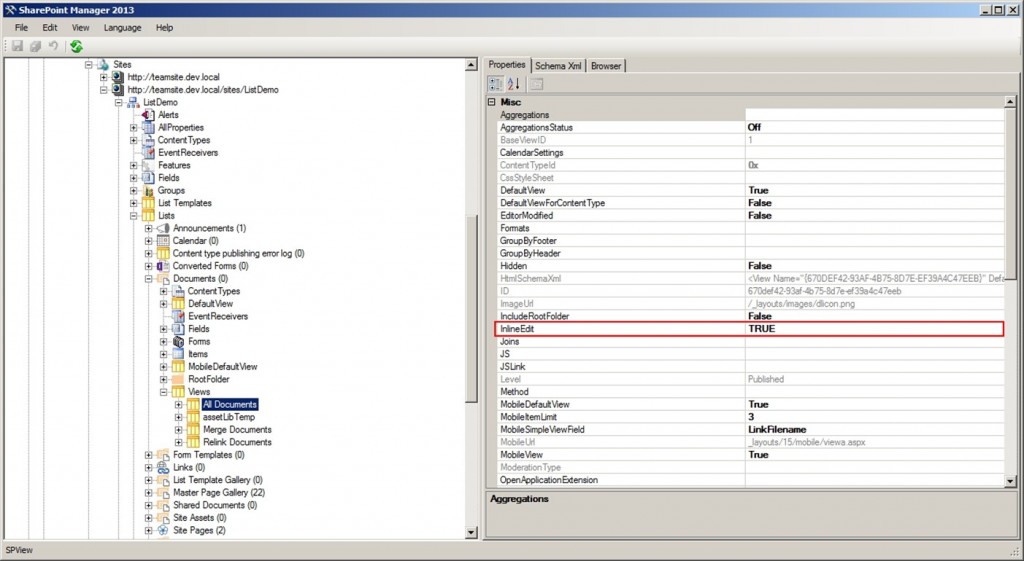
When opening SharePoint Manager we’ll browse to the list view first and see what properties are set:020114_1215_DisableInli5.jpg

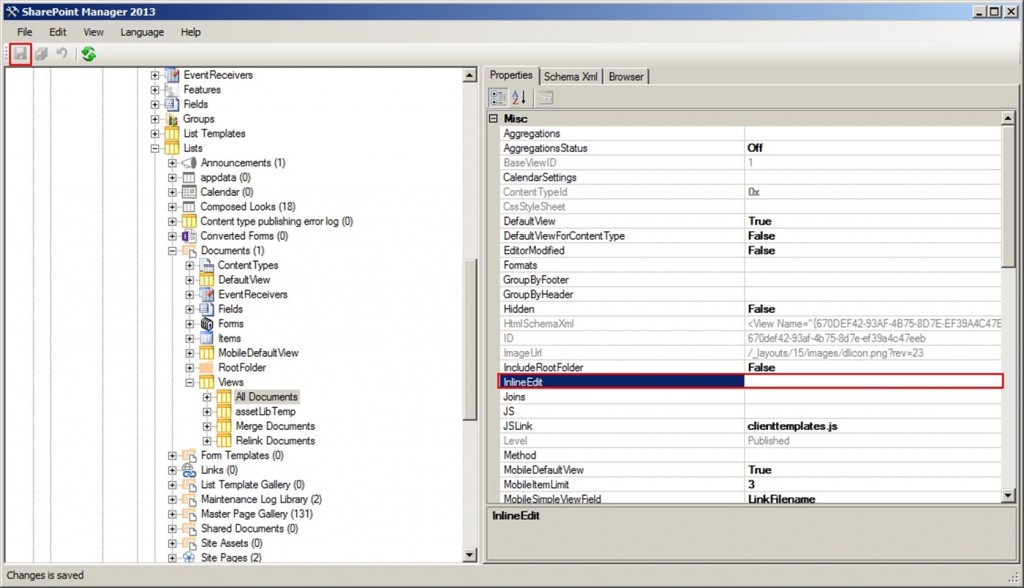
As you can see there is a property called InlineEdit on the All Documents View which is set to TRUE. This corresponds to the setting we’ve set when we were using SharePoint 2010 or running in 2010 mode. After some testing I found out that setting to FALSE doesn’t do anything! The only way to disable Inline Editing properly on a view is clearing the value of the InlineEdit property.

Using SharePoint Manager first clear the value and then click the save button in the upper left corner:020114_1215_DisableInli6.jpg

After refreshing the browser your list view has now a new 2013 style look:020114_1215_DisableInli7.jpg

Now you can use also the inline search functionality which is missing when Inline Editing was disabled. This is from my perspective the main reason why you don’t want to use Inline Editing anymore in SharePoint 2013. When disabling the list view property for Inline Editing by using custom code, make sure that you set the property to a null value. Otherwise Inline Editing will not be disabled properly. Hopefully this post will save you a headache when finding the root cause when the new style of list views is not working on all your lists and views.